# Move Embellishment to Decorator
將修飾碼移動到 Decorator
# 動機
當系統需要新功能時,常見作法是為舊有的類別增加新的程式碼,這樣的程式碼經常用來修飾核心任務或是舊有類別的主要行為。這樣的修飾引入新的欄位、函式、新的邏輯使原本的類別(host classes)變得複雜。
Decorator pattern 提供很好的補救方法:令每個修飾碼成為一個新的類別,讓這個類別包覆(wrap)它所要修飾的物件型別。當客戶需要特殊行為時,就可以在執行期以這個修飾類別包覆它的目標物件。
JUnit 測試框架提供個好範例。JUnit 每個測試都是一個 TestCase 物件,有個簡單方法可以讓 JUnit 框架執行所有 TestCase 物件。但如果想要執行某個測試一次以上,你必須以 RepeatedTest Decorator 來修飾 TestCase 物件,如下圖:

如果想從「擁有多個 public 函式」的類別中移出修飾碼,你不能 refactor to Decorator。因為 Decorator 必須是《Design Patterns》所稱的「透明圍欄」(transparent enclosure):它必須實作出它所修飾的類別的所有 public 函式(那就需要為「擁有多個 public 函式」的類別撰寫許多無用的程式碼)。當透明圍欄包覆物件時,對被包覆物來說是透明的,被修飾物並不知道他已經被修飾。
使用這個 pattern 的另一個考量是多重 Decorators。如果你為每個物件撰寫一個以上的 concrete Decorators,客戶就可以使用多個 Decorators 來修飾物件實體。有時候 Decorators 順序很重要,理想情況是讓它保持彼此間獨立,可以被任意排列。但有時候做不到,這時可以考慮封裝 Decorators,讓客戶透過特定的 Creation Methods 取用 Decorators 的安全組合(See Encapsulate Classes with Factory)。
以重構手法抽離類別內的修飾碼(embellishments)會讓一個願意接受 object composition 的人覺得比較簡單。但對不願意接受的人,過去一向放在單一類別內的程式碼如今散佈在多個類別,這樣有可能讓程式碼難以理解。而且,程式碼位於不同物件也比較難除錯,除錯模組必須穿越一個或多個 Decorators 才能到達被修飾物。如果團隊難以接受使用 object composition 來修飾物件,這個團隊便是還沒準備好使用這個 pattern。
有時候修飾碼用來提供物件保護邏輯。這時候可以把修飾碼移到 Protection Proxy(See Encapsulating Inner Classes)。Protection Proxy 和 Decorator 結構一樣,不同的是目的。Protection Proxy 目的是保護物件,Decorator 目的是增加物件行為。
作者喜歡 Decorator pattern,但是發現並不常 refactor to Decorator,更常 refactor towards Decorator。不論多麼喜歡一個 pattern,請在確實需要用到時使用。
Decorator vs. Strategy
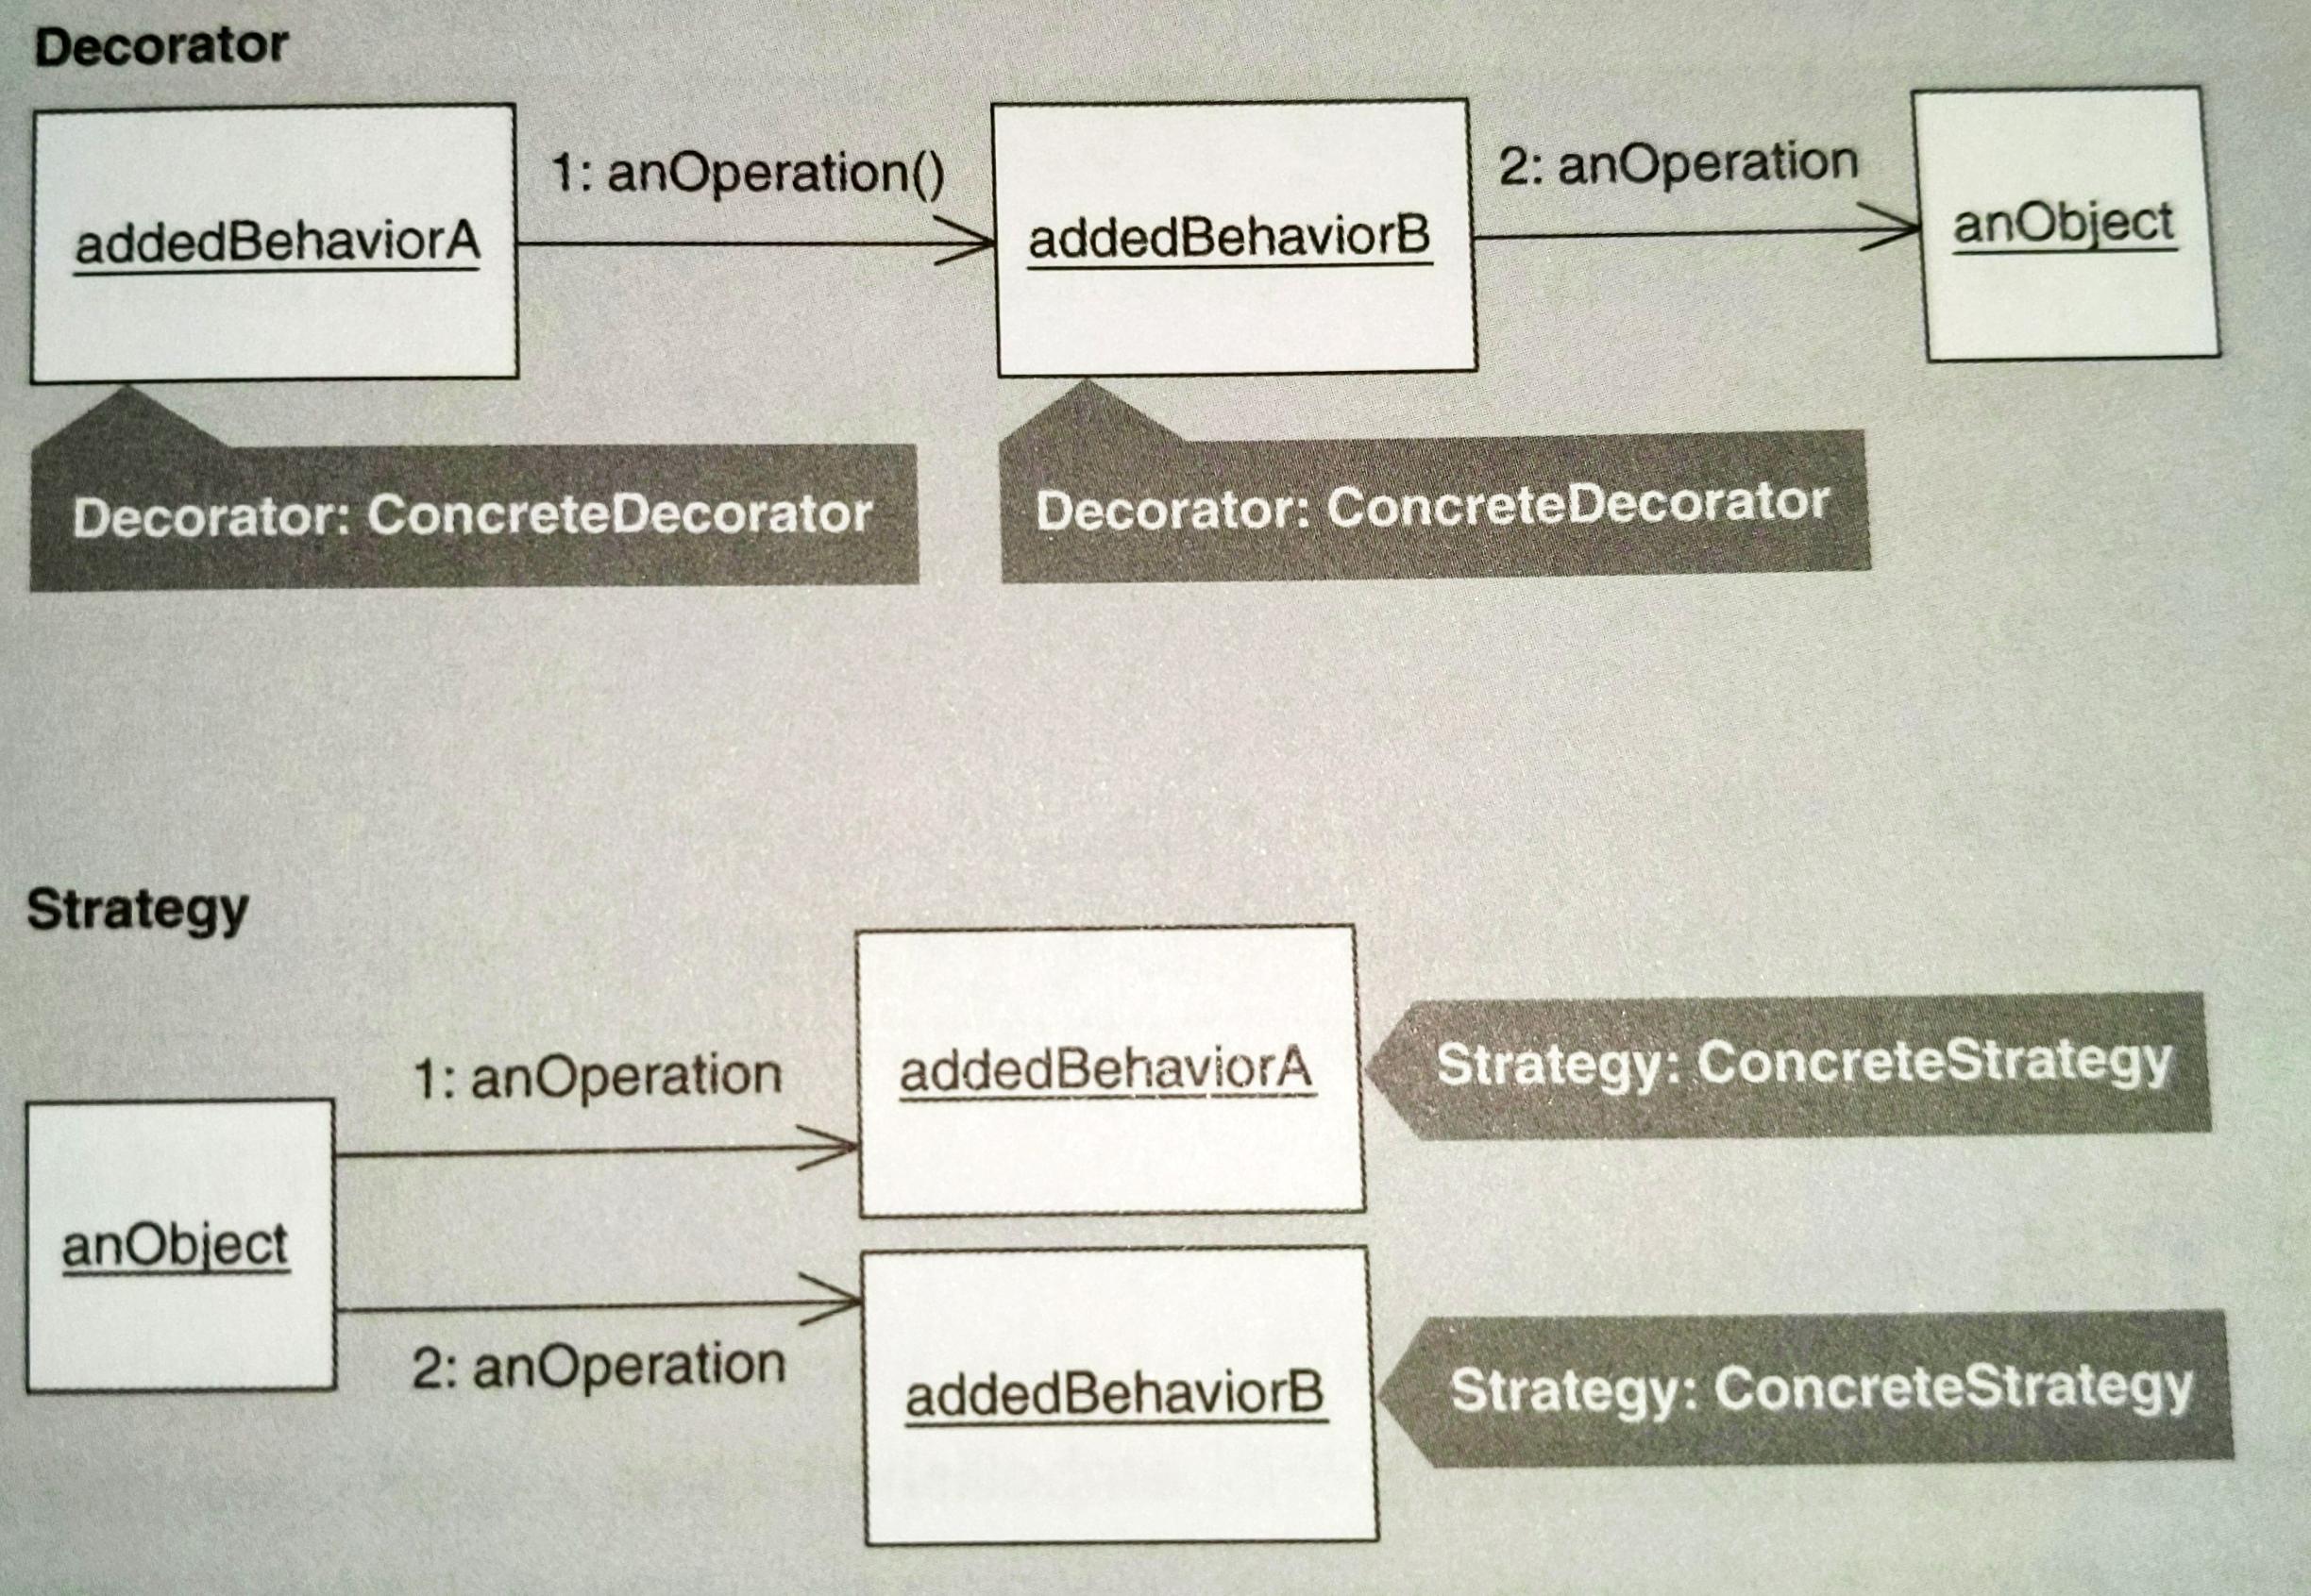
Move Embellishment to Decorator 和 Replace Conditional Logic with Strategy 是彼此互斥的重構手法。它們都可以消除與「特殊情況」或「非此即彼(alternative)的行為」相應的條件邏輯,作法是把那樣的行為從既有的類別中移到新類別內。但這兩個 patterns 中,新類別的用法並不同。Decorator 實體本身會包覆物件,而 Strategy 實體則是被用於某物件內,如下圖:
該在什麼時候 refactor to Decorator 或 Strategy 才合理?下決定之前要考慮許多問題:
- 你無法分享 Decorator 實體 -- 每個實體包覆一個物件。但你卻可以輕鬆利用 Singleton 或 Flyweight patterns 來分享 Strategy 實體。
- Strategy 可擁有它所要的任何 interface,Decorator 則必須符合它所修飾的類別的 interface。
- Decorators 能夠透明的對多個不同類別增加行為,只要類別和 Decorators 共用相同 interface。但是想使用 Strategy 物件的類別卻必須知道它們的存在,以及知道如何使用它們。
- 在「持有許多資料或實作許多 public 函式」的類別身上使用一個或多個 Strategies 是常見的實務作法。但如果 Decorator 類別運用許多資料和 public 函式來修飾類別,Decorators 會變得太笨重,而且需要過多記憶體。
優點
- 透過「從類別中移除修飾碼」的方式來簡化類別。
- 有效區別類別的「修飾碼」和「核心任務」。
- 有助於移除重複於幾個相關類別之間的修飾邏輯。
缺點
- 會變更被修飾物件的物件身份(object identity)。
- 程式碼會變得更難理解和除錯。
- 當 Decorators 之間的組合產生不良的互相影響時,設計會變得更複雜。
# 作法
重構前先識別 embellished class,這個 class 內有對核心任務進行修飾行為。並不是每個內含「對核心任務進行修飾」的類別都是良好的被修飾候選。首先要確認 Decorator 需要實作的 public 函式不會太多。因為 Decorator 在修飾物周圍形成一個透明圍欄(transparent enclosure),客戶碼應該能夠像正常呼叫「原始物件身上的 public 函式」那樣呼叫修飾後的物件。如果 embellished class 宣告並繼承許多 public 函式,可以考慮減少數量,或是使用不同的重構方法,例如:Replace Conditional Logic with Strategy。
找出或建立 enclosure type,這是個 interface 或 class,宣告出 embellished class 的客戶所需的全部 public 函式。這個型別也是《Design Patterns》的 Decorator:Component。
如果你有了一個 enclosure type,它可能是「由 embellished class 實作的 interface」或「embellished class 的 superclass」。有狀態的類別並不是好的 enclosure types,因為 Decorators 會繼承但不用。如果你沒有合適的 enclosure type,可以用 Unify Interfaces 或 Extract Interface 建立一個。
找出「在你的 embellished class 中加入修飾動作」的那個條件邏輯,實施 Replace Conditional with Polymorphism 移除。如果在修飾碼前後有「必須執行的邏輯」,可能需要先使用 Form Template Method。
步驟 2. 產出一個或多個 subclasses,實施 Replace Inheritance with Delegation 改造成 delegating classes。一定要遵守以下:
- 讓每個 delegating classes 實作 enclosure type。
- 讓 delegating classes 的
delegate欄位(受託者)型別是 enclosure type。 - 決定修飾碼該在 delegating classes 呼叫
delegate欄位之前或之後執行。
如果在步驟 2. 實施 Form Template Method,你的 delegating classes 可能需要呼叫「被你的 Template Method 引用的 delegate」(亦即 embellished class)的 non-public 函式。如果真是如此,把這些函式的可視度改成 public 並實施 Unify Interfaces。
如果你的 delegating classes 委託的那個「位於 embellished class 內」的函式回傳的是個 undecorated 的物件實體,請確定你的 delegating classes 把該實體傳給客戶之前先修飾它。
每個 delegating classes 現在賦值其 delegate 欄位,使其指向 embellished class 的一份新的實體。讓 delegating classes 建構式完成這個賦值邏輯,然後實施 Extract Parameter 將「具現 embellished class」的賦值句抽取成一個參數。可能的話重複實施 Remove Parameter 移除任何不必要的建構式參數。
# 範例
範例來自 HTML Parser (opens new window)。HTML Parser 可以把 HTML 內容視為具體物件,遇上 tag 資料會轉譯成適當的 HTML 物件,如 Tag, EndTag 等等。
典型的 character reference decodings 包括:
&->&÷->÷<-><>->>
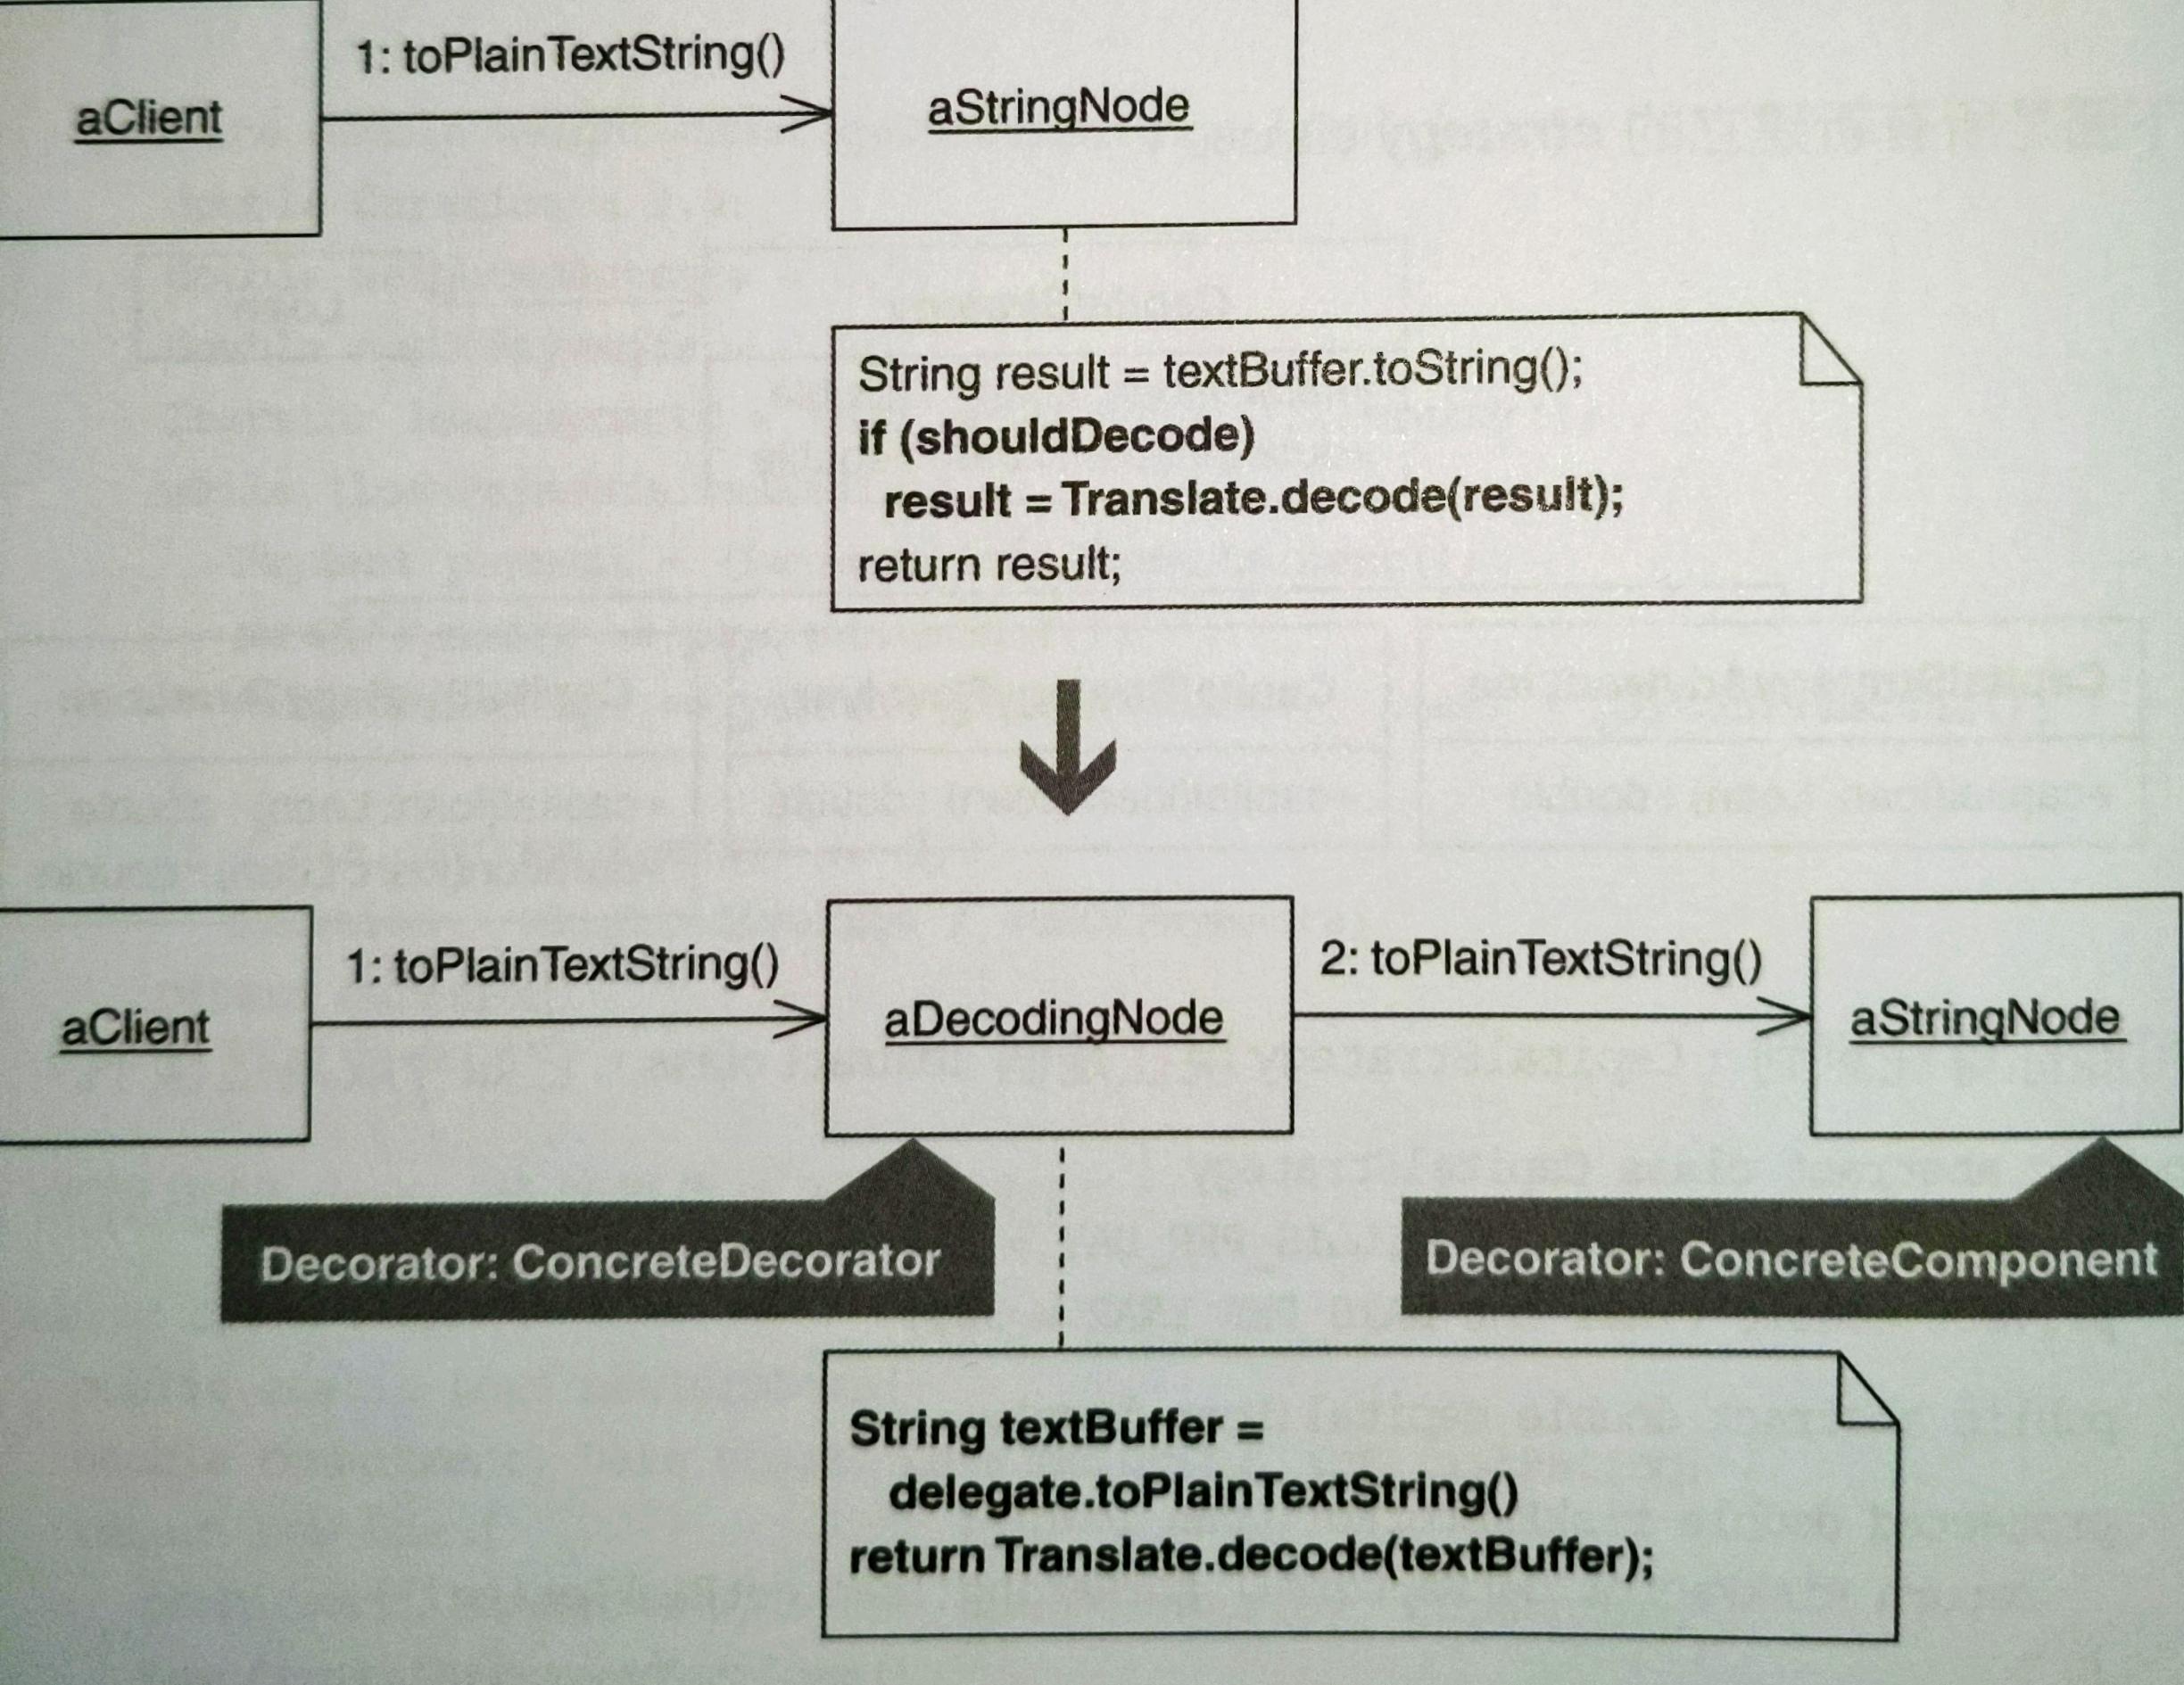
parser 的 Translate class 有一個 decode(String dataToDecode) 函式,能夠解譯廣泛的「數字和文字的 entity references」。上述解譯動作是個修飾行為,常用在 StringNode 實體被 parser 發現之後。例如:剖析一小段 HTML 然後迭代遍歷一群 Node 實體,解譯 StringNode 實體的那些節點:
public void testDecodingAmpersand() throws Exception {
    String ENCODED_WORKSHOP_TITLE = "The Testing & Refactoring Workshop";
    String DECODED_WORKSHOP_TITLE = "The Testing & Refactoring Workshop";
    assertEquals( "ampersand in string", DECODED_WORKSHOP_TITLE, parseToObtainDecodedResult(ENCODED_WORKSHOP_TITL E));

}

private String parseToObtainDecodedResult(String stringToDecode) throws ParserException {
    StringBuffer decodedContent = new StringBuffer();
    createParser(stringToDecode);
    NodeIterator nodes = parser.elements();

    while (nodes.hasMoreNodes()) {
        Node node = nodes.nextNode();
        if (node instanceof StringNode) {
            StringNode stringNode = (StringNode) node;
            decodedContent.append(
                Translate.decode(stringNode.toPlainTextString())    // decoding step
            );

            if (node instanceof Tag)
                decodedContent.append(node.toHtml());
        }

    return decodedContent.toString();
}
2
3
4
5
6
7
8
9
10
11
12
13
14
15
16
17
18
19
20
21
22
23
24
25
26
解譯 StringNode 實體內的「文字和數字的 references」是客戶端有時候需要的功能,但客戶總是親自解譯,用相同的順序:
- 迭代遍歷節點
- 找出
StringNode - 解譯它們 其實應該在 parser 中建立這個解譯行為,把工作集中起來,而非強迫客戶重複相同的解譯步驟。
作者想了幾個方法,選了其中簡單的一個:直接在 StringNode 中增加解譯修飾行為,然後觀察程式後續發展。工作包括:
- 更新測試碼
- 改變
Parserclass - 改變
StringParserclass (它用來具現StringNode) - 改變
StringNode
以下展示如何更新前述的測試碼:
public void testDecodingAmpersand() throws Exception {
    String ENCODED_WORKSHOP_TITLE = "The Testing & Refactoring Workshop";
    String DECODED_WORKSHOP_TITLE = "The Testing & Refactoring Workshop";
    StringBuffer decodedContent = new StringBuffer();
    Parser parser = Parser.createParser(ENCODED_WORKSHOP_TITLE);
    parser.setNodeDecoding(true); // tell parser to decode StringNodes

    NodeIterator nodes = parser.elements();

    while (nodes.hasMoreNodes())
        decodedContent.append(nodes.nextNode().toPlainTextString());

    assertEquals("decoded content", DECODED_WORKSHOP_TITLE, decodedContent.toString() );
}
2
3
4
5
6
7
8
9
10
11
12
13
14
第一步是先擴展 Parser class,讓它擁有一個 flag 管理 StringNode 的解譯開關:
public class Parser {
    // ...
    private boolean shouldDecodeNodes = false;

    public void setNodeDecoding(boolean shouldDecodeNodes) {
        this.shouldDecodeNodes = shouldDecodeNodes;
    }
}
2
3
4
5
6
7
8
接下來 StringParser class 需要改變。它含有一個 find(...),這個函式在剖析過程中定位、具現及回傳 StringNode 實體,如下:
public class StringParser {
    // ...
    public Node find(NodeReader reader, String input, int position, boolean balance_quotes) {
        // ...
        return new StringNode(textBuffer, textBegin, textEnd);
    }
}
2
3
4
5
6
7
作者變更程式碼來支援新的解譯選項:
public class StringParser {
    // ...
    public Node find(NodeReader reader, String input, int position, boolean balance_quotes) {
        // ...
        return new StringNode(textBuffer, textBegin, textEnd,
        reader.getParser().shouldDecodeNodes());
    }
}
2
3
4
5
6
7
8
把 shouldDecodeNodes() 加入 Parser class 並建立一個新的 StringNode 建構式,讓它帶有一個 bool 參數:
public class Parser {
    // ...
    public boolean shouldDecodeNodes() {
        return shouldDecodeNodes;
    }
}

public class StringNode extends Node {
    // ...
    private boolean shouldDecode = false;

    public StringNode(StringBuffer textBuffer, int textBegin, int textEnd, boolean shouldDecode) {
        this(textBuffer, textBegin, textEnd);
        this.shouldDecode = shouldDecode;
    }
}
2
3
4
5
6
7
8
9
10
11
12
13
14
15
16
最後,在 StringNode 撰寫解譯邏輯:
public class StringNode {
    // ...
    public String toPlainTextString() {
        String result = textBuffer.toString();

        if (shouldDecode)
            result = Translate.decode(result);

        return result;
    }
}
2
3
4
5
6
7
8
9
10
11
順利通過測試。觀察一下發現新增的解譯修飾行為沒有太過分膨脹程式碼。但是,一旦支援某個修飾行為,很容易找到其他值得支援的修飾行為。例如從 StringNode 移除跳脫字元(escape character),因此作者給 parser 一個修飾行為來移除跳脫字元。為此,要給 Parser class 增加一個 flag,還要修改 StringParser 讓它呼叫一個同時能處理解譯選項和跳脫字元移除選項的 StringNode 建構式,並在 StringNode 增加程式碼如下:
public class StringNode {
    // ...
    private boolean shouldRemoveEscapeCharacters = false;

    public StringNode(StringBuffer textBuffer, int textBegin, int textEnd, boolean shouldDecode, boolean shouldRemoveEscapeCharacters) {
        this(textBuffer, textBegin, textEnd);
        this.shouldDecode = shouldDecode;
        this.shouldRemoveEscapeCharacters = shouldRemoveEscapeCharacters;
    }

    public String toPlainTextString() {
        String result = textBuffer.toString();

        if (shouldDecode)
            result = Translate.decode(result);

        if (shouldRemoveEscapeCharacters)
            result = ParserUtils.removeEscapeCharacters(result);

        return result;
    }
}
2
3
4
5
6
7
8
9
10
11
12
13
14
15
16
17
18
19
20
21
22
這兩個修飾行為簡化了 parser 的客戶碼。但是每次為了支援一個新的修飾行為就被迫橫跨多個 parser classes 的變更,這是壞味道 解法蔓生(Solution Sprawl) 的徵兆。壞味道肇因於:
- 太多初始化邏輯。
- 太多修飾邏輯。
推論:初始化問題最佳解決方式是傳給 parser 一個 Factory 實體,這個實體會在執行期適當具現已經設定好的 StringNode 實體(見:Move Creation Knowledge to Factory。進一步推論:修飾邏輯的建立可以經由 refactor to Decorator or Strategy 的方式解決。
哪個 pattern 比較有用?探究 StringNode 的 sibling classes (e.g. RemarkNode) 發現它們也能得益於解譯行為和移除跳脫字元行為。如果把這些行為 refactor to Strategy,那麼 StringNode 的 sibling classes 必須改動,但對 Decorator 就不用,因為可以讓 Decorators 包覆 StringNode 和其 sibling classes。
效能上不考慮太多,作者傾向使用 profiler 處理這問題。如果 Decorator 效能太差,不需要太多工夫可以 refactor to Strategy。
現在需要決定 Decorator 是否適合上面的程式碼,要先了解類別是否夠簡單、夠原始(primitive),以至於 decoration 是可行的。簡單原始是指類別沒有實作大量 public 函式或是宣告許多欄位。作者發現 StringNode 夠簡單,但是 AbstractNode 並不是,如下圖:
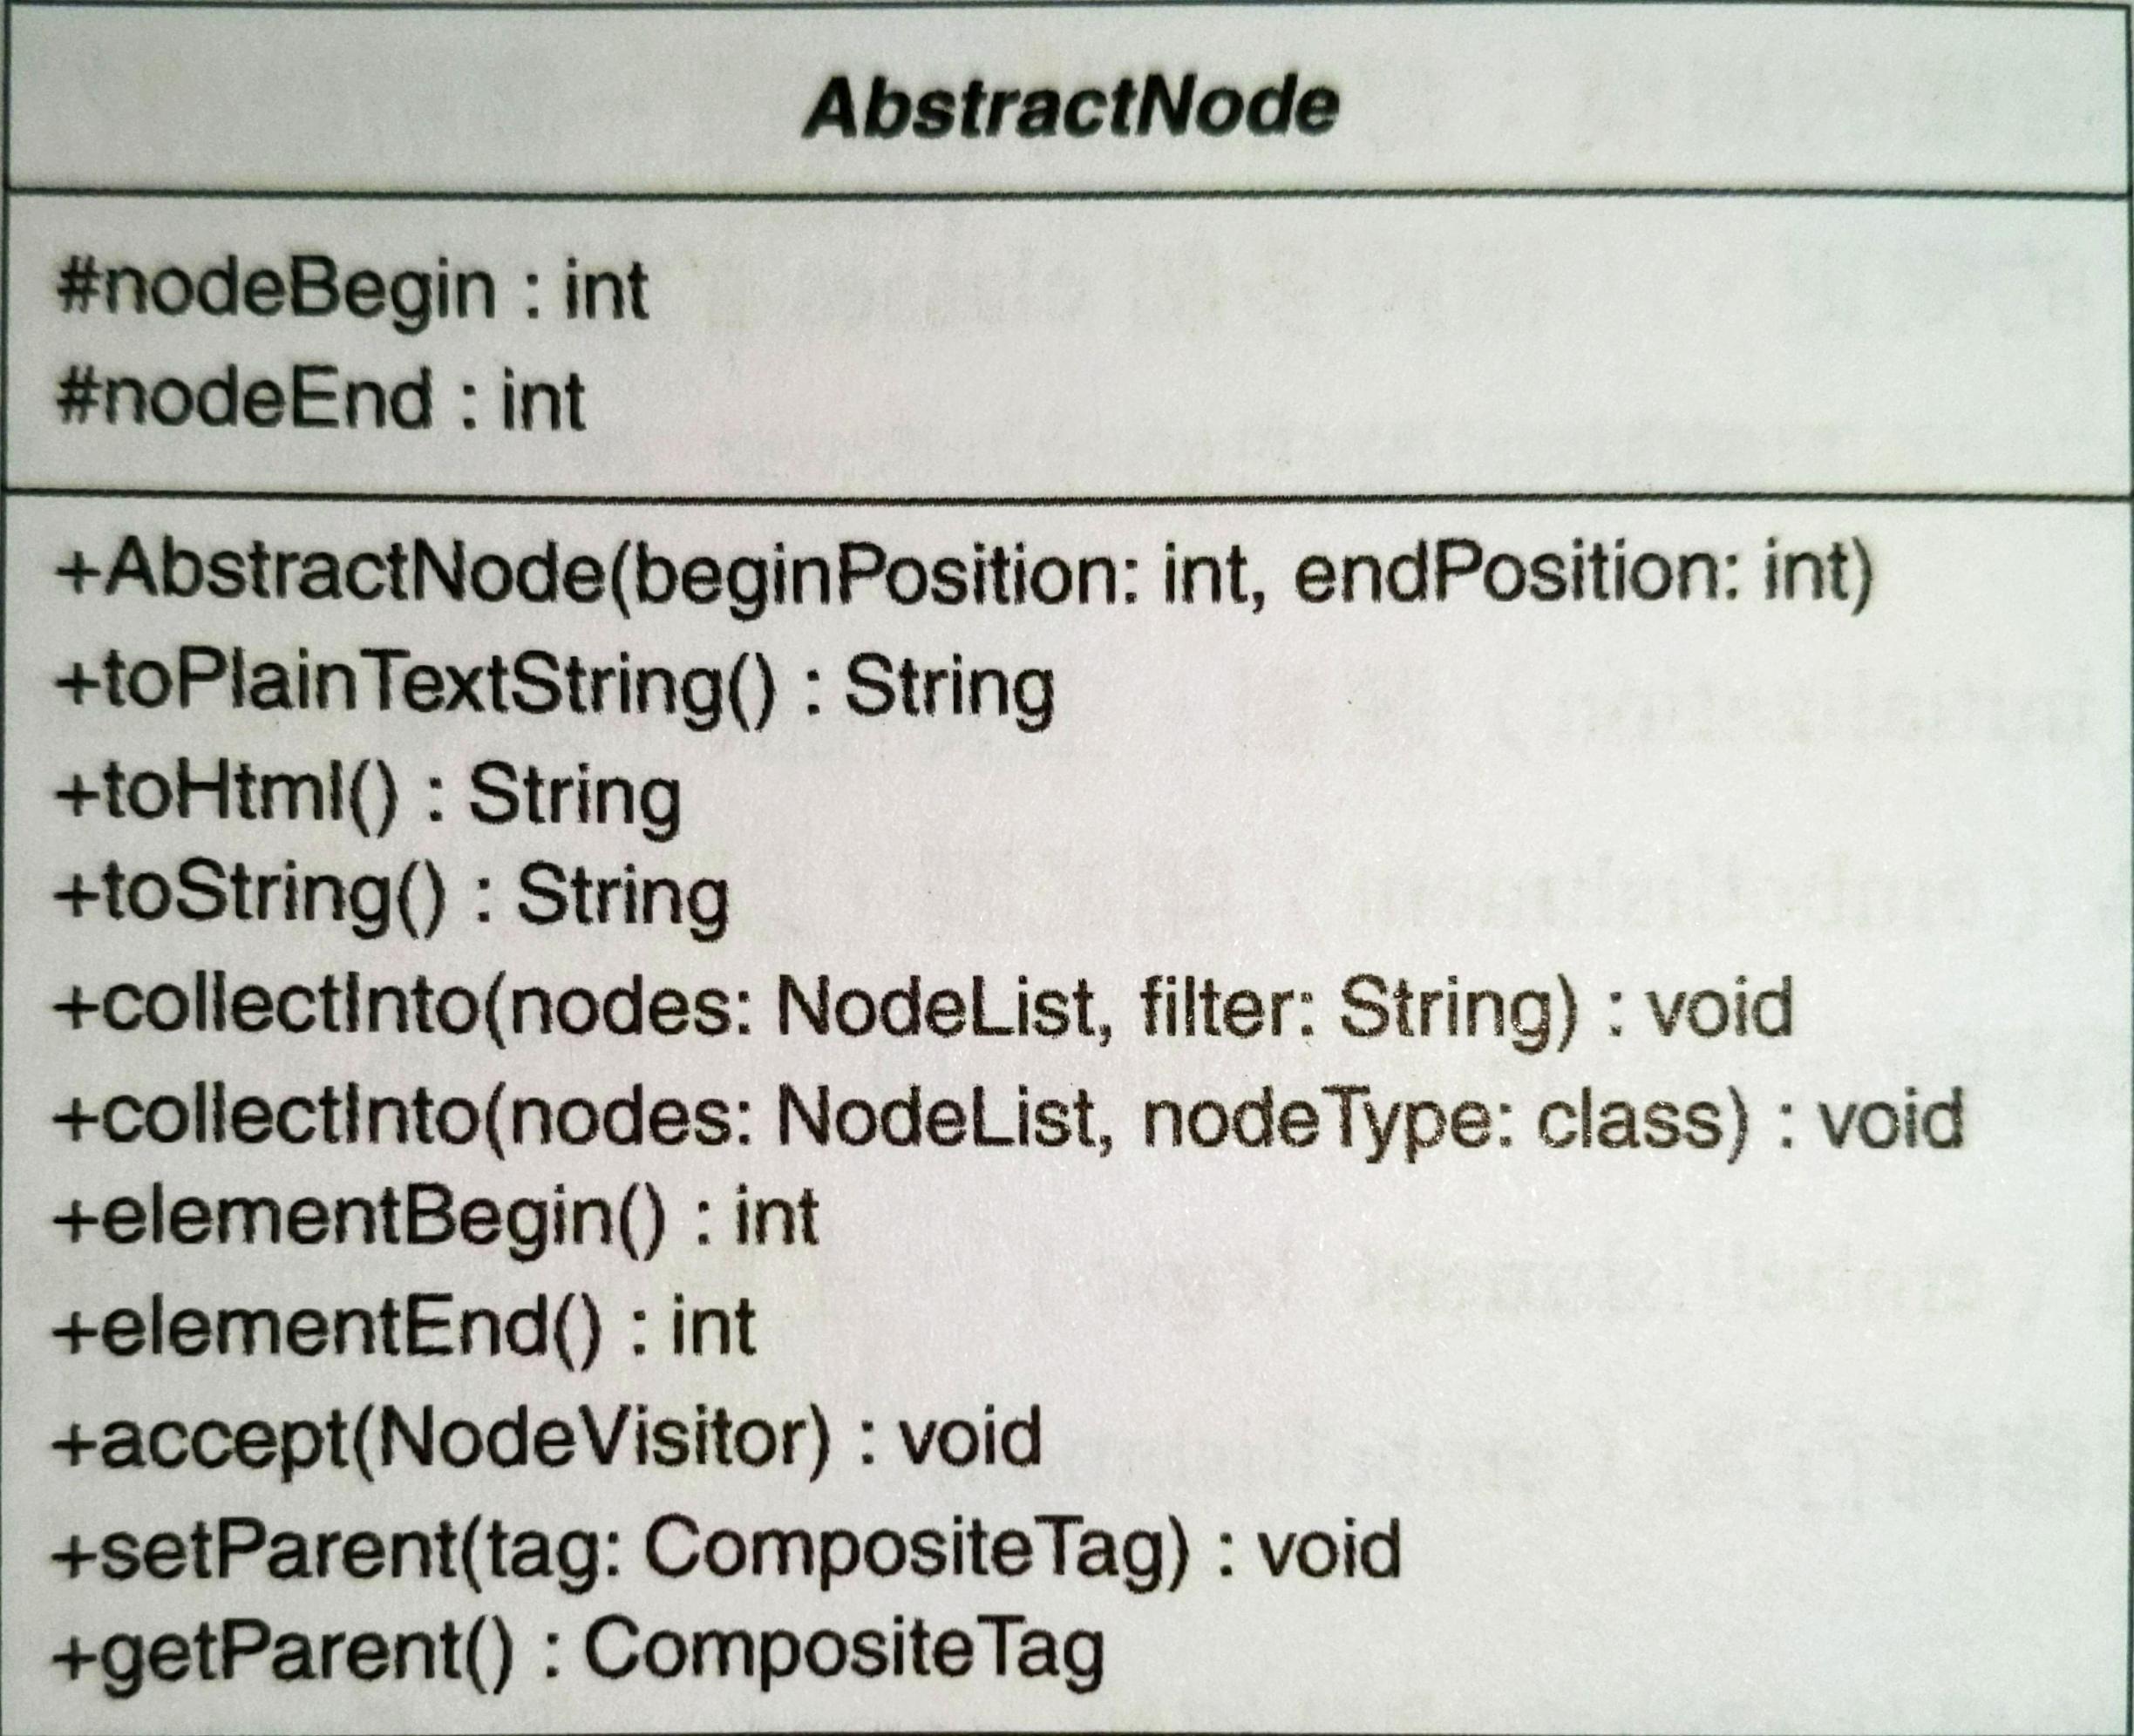
總共 10 個 public 函式!
現在開始重構,目標是讓每個修飾行為自己佔用一個 StringNode Decorator 類別,以便把修飾邏輯從 StringNode 移出。如果需要支援多個修飾行為,在剖析之前可能要先設定 StringNode Decorators 的組合。
下圖說明 StringNode 在何處納入 Node 體系,還有解譯邏輯的長相:
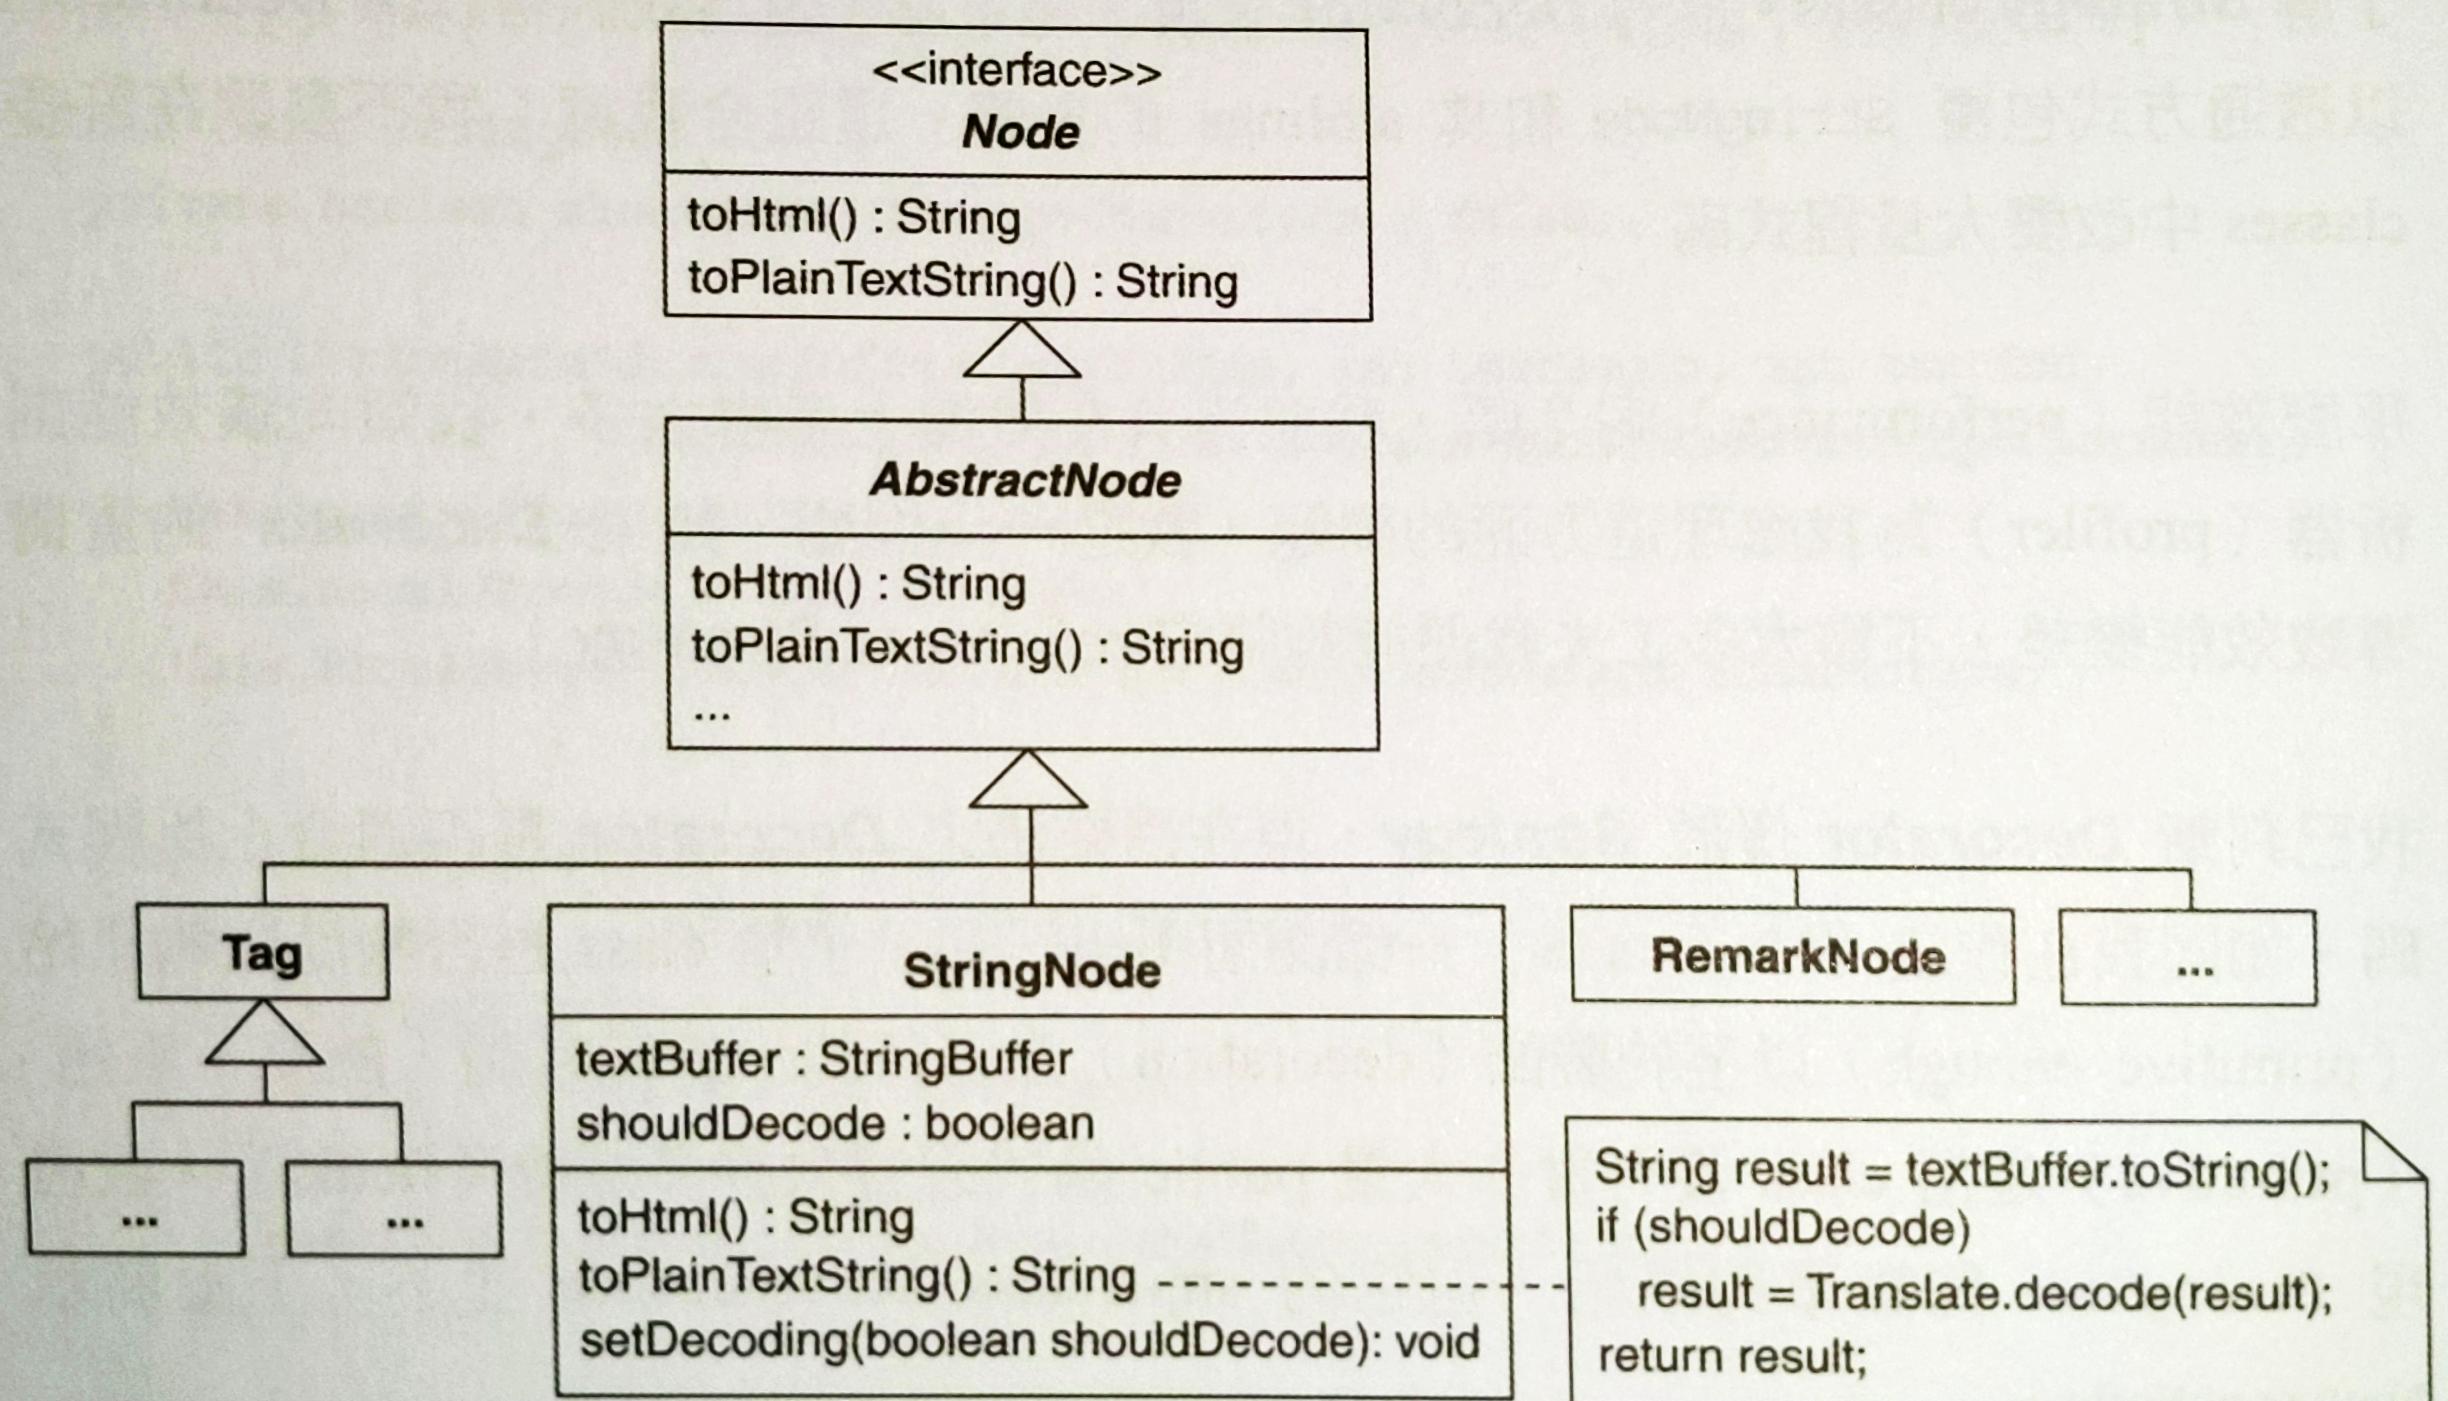
以下開始重構 StringNode 的解譯邏輯為 Decorator:
找出 enclosure type (class or interface),它宣告
StringNode和繼承者的全部 public 函式。好的 enclosure type 不含欄位。為何欄位重要?Decorator 在修飾的物件增加行為,但不需要複製一份物件內的欄位。
接下來看
AbstractNode的 interface --Node: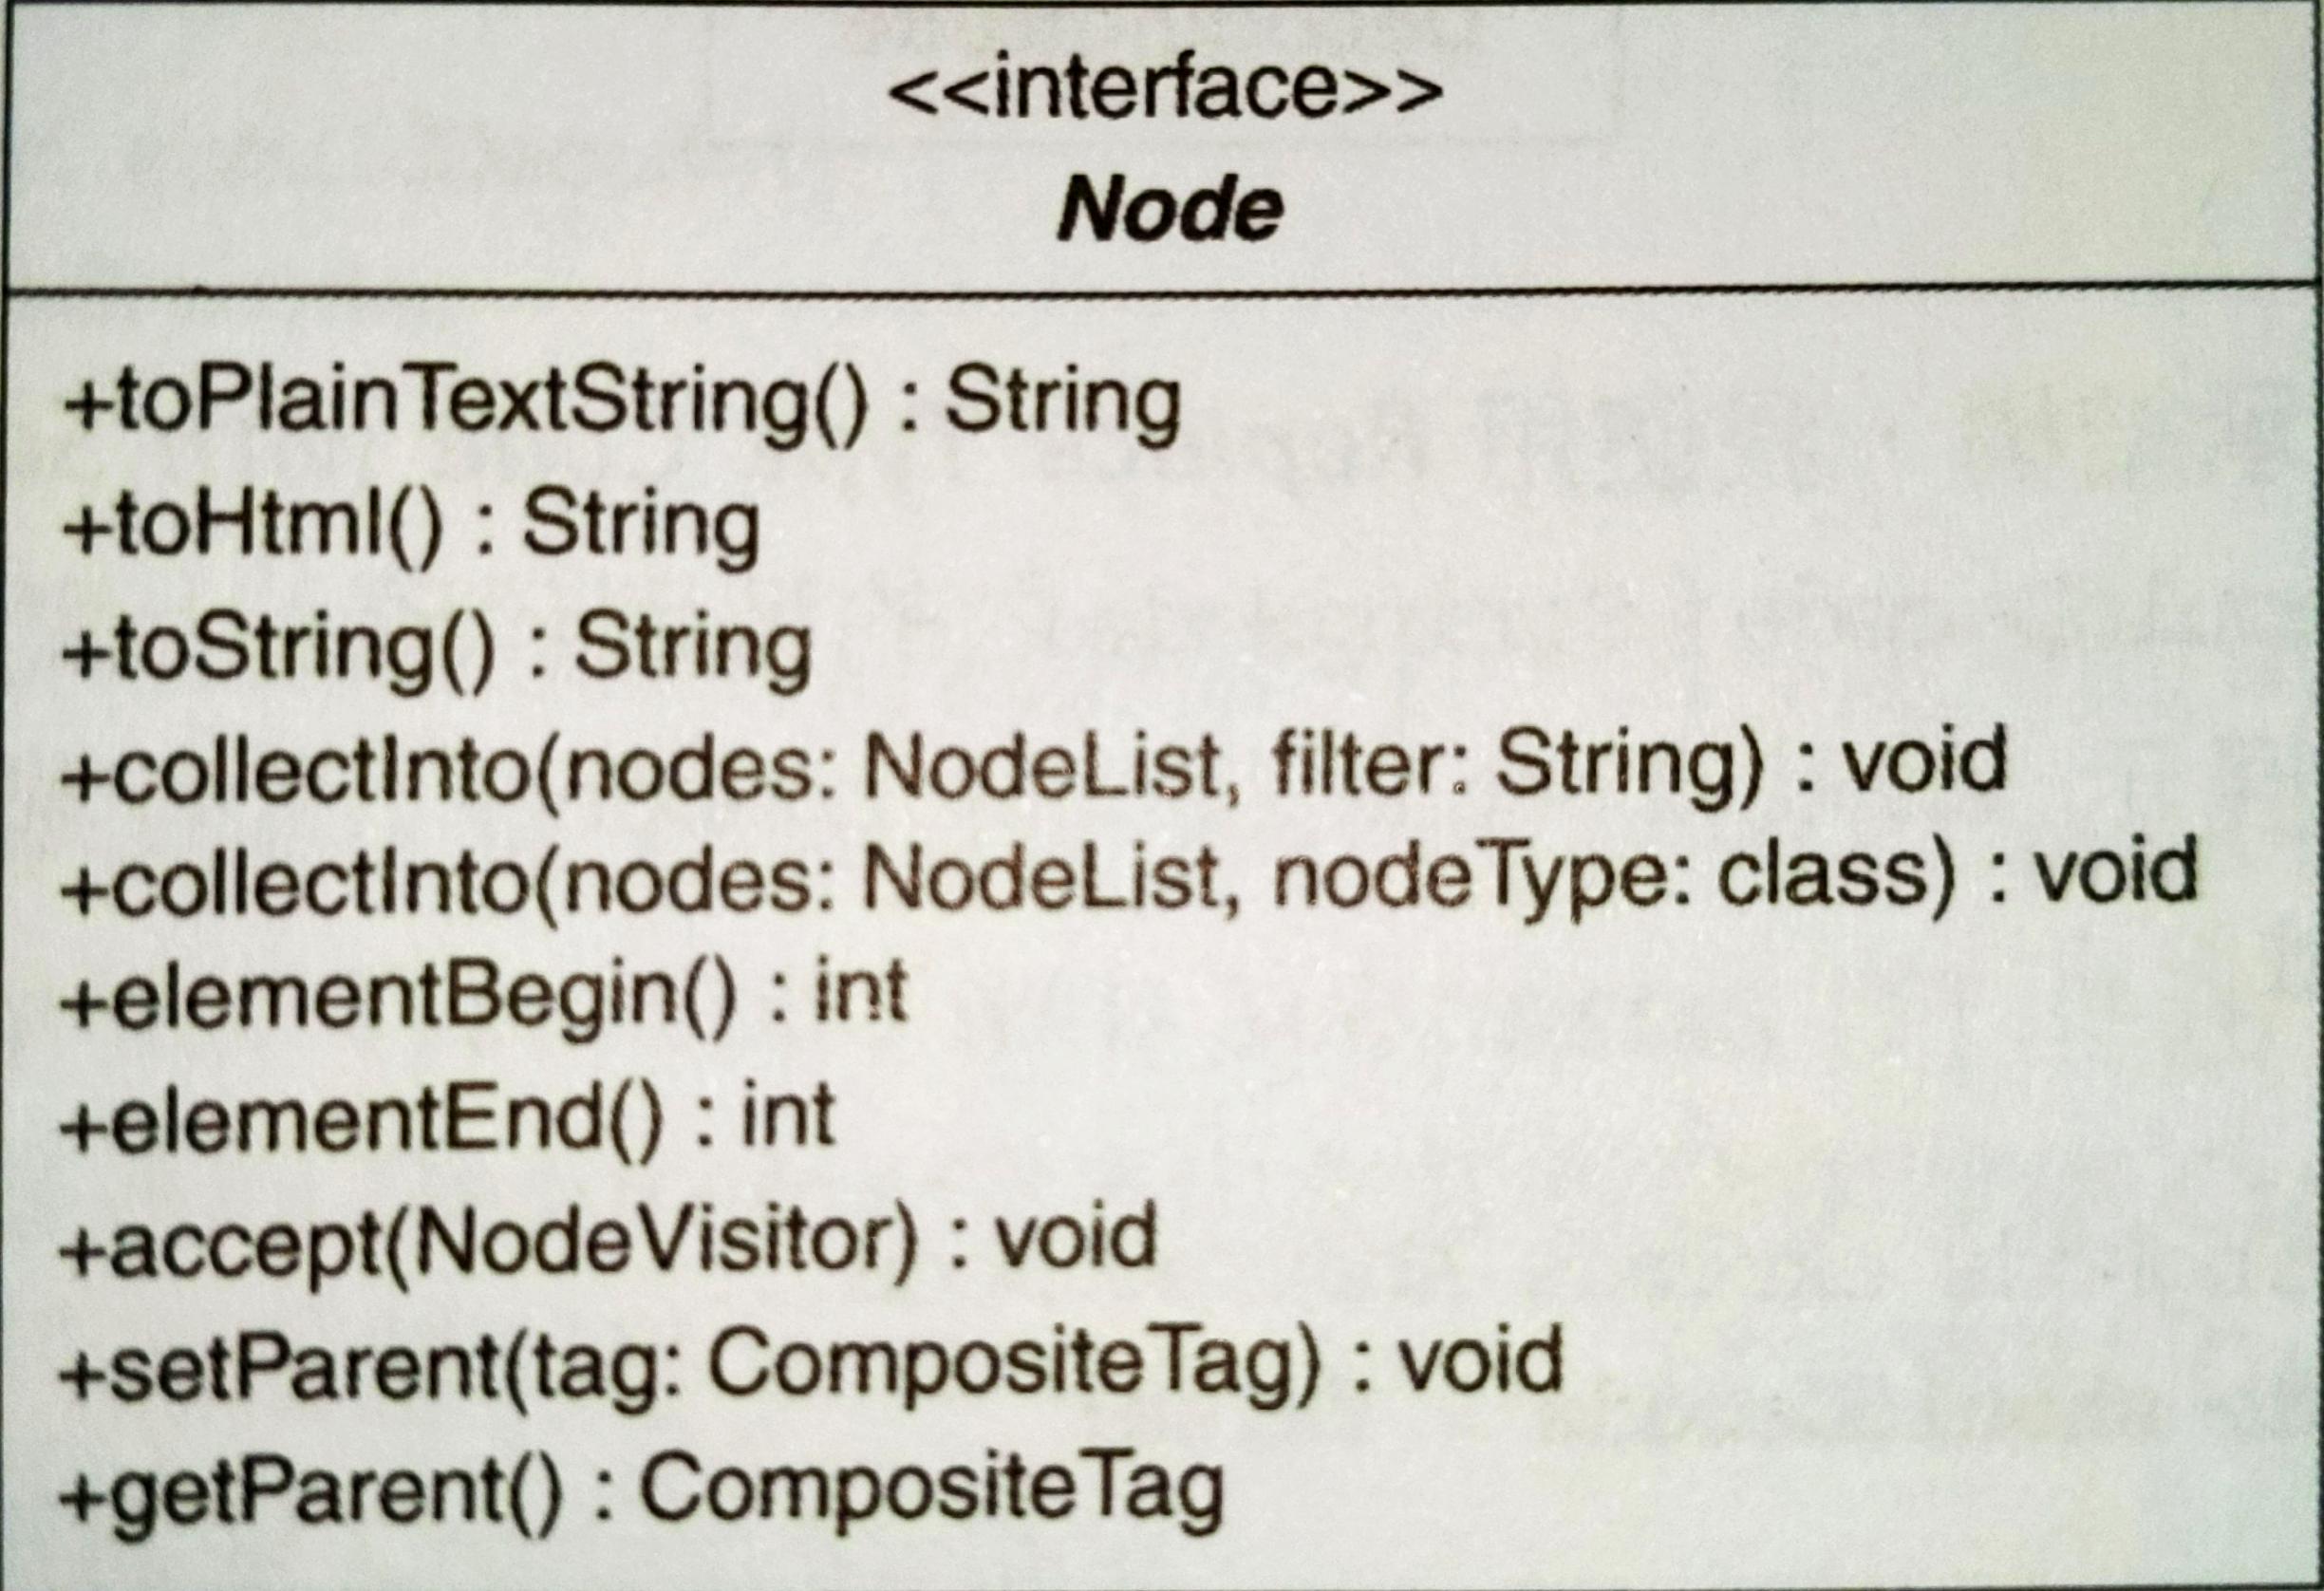 它沒有
它沒有 StringNode的兩個 public 函式 --getText()和setText(...)。除此之外是個很好的 enclosure type。因此,把這兩個函式加入Node中。但是所有實作Node的 concrete classes 都必須實作getText()和setText(...),所以實施 Unify Interfaces 增加getText()和setText(...)並提供如下給AbstractNode:public abstract class AbstractNode { // ... public String getText() { return null; } public void setText(String text) { } }1
2
3
4
5
6
7
8
9進行 Replace Conditional with Polymorphism 替換 `StringNode 的解譯修飾行為,目標是獲得如下的繼承結構:
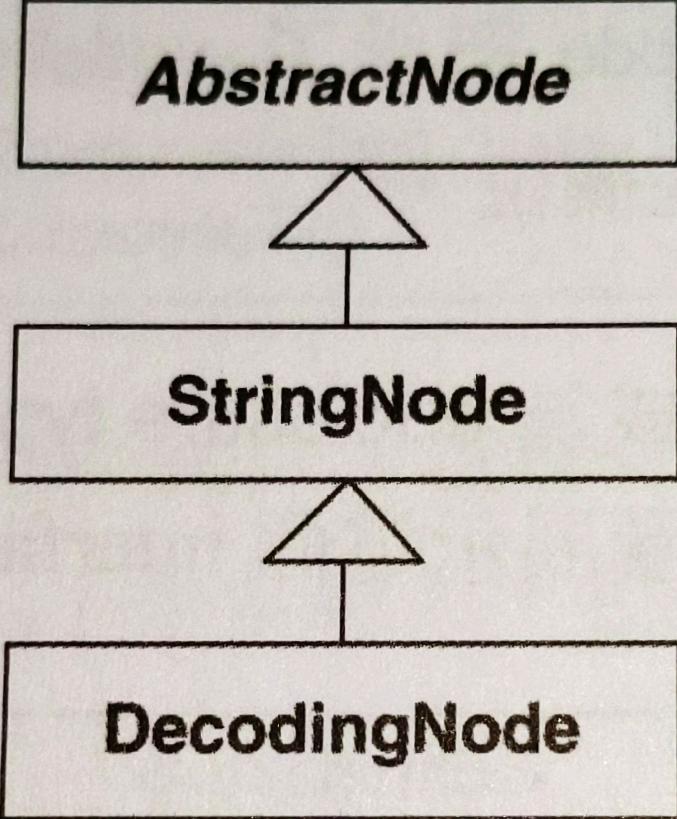
為了建立這個結構,作者使用 Replace Type Code with Subclass。第一步是在
shouldDecode實施 Self-Encapsulate Field。以下是shouldDecode在StringNode內部如何被使用:public class StringNode extends AbstractNode { // ... private boolean shouldDecode = false; public StringNode(StringBuffer textBuffer, int textBegin, int textEnd, boolean shouldDecode) { this(textBuffer, textBegin, textEnd); this.shouldDecode = shouldDecode; } public String toPlainTextString() { String result = textBuffer.toString(); if (shouldDecode) result = Translate.decode(result); return result; } }1
2
3
4
5
6
7
8
9
10
11
12
13
14
15
16
17
18為了達到
shouldDecode自我封裝,作者進行下列改變:public class StringNode extends AbstractNode { // ... public StringNode( StringBuffer textBuffer, int textBegin, int textEnd, boolean shouldDecode) { this(textBuffer, textBegin, textEnd); setShouldDecode(shouldDecode); } public String toPlainTextString() { String result = textBuffer.toString(); if ( shouldDecode() ) result = Translate.decode(result); return result; } private void setShouldDecode(boolean shouldDecode) { this.shouldDecode = shouldDecode; } private boolean shouldDecode() { return shouldDecode; } }1
2
3
4
5
6
7
8
9
10
11
12
13
14
15
16
17
18
19
20
21
22
23幾乎要完成自我封裝,只差新的
StringNode建構式,它以參數接受型別代碼shouldDecode,必須以 Creation Method 取代這個建構式。作法一節也描述這個 Creation Method 回傳型別為Node,這件事對 Decorator 實作非常重要。下面是 Creation Method:public class StringNode extends AbstractNode { // ... private StringNode( StringBuffer textBuffer, int textBegin, int textEnd, boolean shouldDecode) { this(textBuffer, textBegin, textEnd); setShouldDecode(shouldDecode); } public static Node createStringNode( StringBuffer textBuffer, int textBegin, int textEnd, boolean shouldDecode) { return new StringNode(textBuffer, textBegin, textEnd, shouldDecode); } }1
2
3
4
5
6
7
8
9
10
11
12修改後,客戶端改呼叫 Creation Method:
public class StringParser {
    // ...
    public Node find(
        NodeReader reader,String input,int position, boolean balance_quotes) { ...
        return StringNode.createStringNode(
            textBuffer, textBegin, textEnd, reader.getParser().shouldDecodeNodes());
    }
}
1
2
3
4
5
6
7
8編譯並測試無誤以後,Replace Type Code with Subclasses 第二步寫著:
為 type code 每個數值建立一個相應的 subclass。在每個 subclass 中覆寫 type code 的 getter,使其傳回相應的 type code。
Type code
shouldDecode有兩個值:true和false。作者決定讓StringNode自己處理false(不解譯),並讓一個新的 subclass --DecodingNode來處理true。先建立DecodingNode並覆寫shouldDecode():public class StringNode extends AbstractNode { protected boolean shouldDecode() { // ... } } public class DecodingNode extends StringNode { public DecodingNode(StringBuffer textBuffer, int textBegin, int textEnd) { super(textBuffer, textBegin, textEnd); } protected boolean shouldDecode() { return true; } }1
2
3
4
5
6
7
8
9
10
11
12
13
14
15變更 Creation Method 來根據
shouldDecode建立適當物件:public class StringNode extends AbstractNode { // ... private boolean shouldDecode = false; public static Node createStringNode(StringBuffer textBuffer, int textBegin, int textEnd, boolean shouldDecode) { if (shouldDecode) return new DecodingNode(textBuffer, textBegin, textEnd); return new StringNode(textBuffer, textBegin, textEnd); } }1
2
3
4
5
6
7
8
9
10
11編譯並測試無誤後,移除 type code
shouldDecode、它的 setter、接受shouldDecode的建構式,用來簡化StringNode。唯一要做的是:讓StringNode的shouldDecode()回傳false:public class StringNode extends AbstractNode { // ... // private boolean shouldDecode = false; public StringNode(StringBuffer textBuffer,int textBegin,int textEnd) { super(textBegin,textEnd); this.textBuffer = textBuffer; } // private StringNode( StringBuffer textBuffer, int textBegin, int textEnd, boolean shouldDecode) { // this(textBuffer, textBegin, textEnd); // setShouldDecode(shouldDecode); // } public static Node createStringNode(StringBuffer textBuffer, int textBegin, int textEnd, boolean shouldDecode) { if (shouldDecode) return new DecodingNode(textBuffer, textBegin, textEnd); return new StringNode(textBuffer, textBegin, textEnd); } // private void setShouldDecode(boolean shouldDecode) { // this.shouldDecode = shouldDecode; // } protected boolean shouldDecode() { return false; } }1
2
3
4
5
6
7
8
9
10
11
12
13
14
15
16
17
18
19
20
21
22
23
24
25
26
27
28現在已經成功建立一個繼承結構,接著實施 Replace Conditional with Polymorphism。
現在想讓
StringNode去除toPlainTextString()內部的條件邏輯,以下是改變前:public class StringNode extends AbstractNode { // ... public String toPlainTextString() { String result = textBuffer.toString(); if (shouldDecode()) result = Translate.decode(result); return result; } }1
2
3
4
5
6
7
8
9
10
11第一步是為
DecodingNode提供一個toPlainTextString()覆寫版本:public class DecodingNode extends StringNode { // ... public String toPlainTextString() { return Translate.decode(textBuffer.toString()); } }1
2
3
4
5
6再來,從
StringNode拿掉已經複製給DecodingNode的邏輯:public class StringNode extends AbstractNode { // ... public String toPlainTextString() { return textBuffer.toString(); // String result = textBuffer.toString(); // if (shouldDecode()) // result = Translate.decode(result); // return result; } }1
2
3
4
5
6
7
8
9
10現在可以安全的在
StringNode和DecodingNode中刪除shouldDecode():public class StringNode extends AbstractNode { // ... // protected boolean shouldDecode() { // return false; // } } public class DecodingNode extends StringNode { // ... // protected boolean shouldDecode() { // return true; // } }1
2
3
4
5
6
7
8
9
10
11
12
13DecodingNode也有些重複:它「呼叫textBuffer.toString()」的行為和StringNode的toPlainTextString()函式內的行為一致。利用呼叫 superclass 來移除重複:public class DecodingNode extends StringNode { // ... public String toPlainTextString() { return Translate.decode( super.toPlainTextString() ); } }1
2
3
4
5
6現在
StringNode不再有 type codeshouldDecode任何痕跡,且toPlainTextString()條件句由多型取代。實施 Replace Inheritance with Delegation。這個重構要先為 subclass
DecodingNode產生一個欄位,指向自己本身:public class DecodingNode extends StringNode { // ... private Node delegate = this; }1
2
3
4讓
delegate型別為Node而非DecodingNode,因為DecodingNode很快就要變成 Decorator,而修飾對象(同時也是委託)必須實作相同的 interface --Node。現在把直接對「繼承來的
StringNode各函式」的呼叫式替換掉,改用委託。唯一「呼叫 superclass 函式」的DecodingNode函式是toPlainTextString():public class DecodingNode extends StringNode { // ... public String toPlainTextString() { return Translate.decode(super.toPlainTextString()); } }1
2
3
4
5
6改用新欄位
delegate:public class DecodingNode extends StringNode { // ... public String toPlainTextString() { return Translate.decode(delegate.toPlainTextString()); } }1
2
3
4
5
6編譯並測試,結果無窮迴圈!發現 Martin 在 Replace Inheritance with Delegation 作法中提到不能直接這樣改,只能破壞繼承關係。
於是
public class DecodingNode { // extends StringNode {
    // ...
    private Node delegate; // = this;

    public DecodingNode(StringBuffer textBuffer, int textBegin, int textEnd) {
        delegate = new StringNode(textBuffer, textBegin, textEnd);
    }
}
1
2
3
4
5
6
7
8這段編譯成功,但是以下卻失敗:
public class StringNode extends AbstractNode {
    // ...
    public static Node createStringNode( StringBuffer textBuffer, int textBegin, int textEnd, boolean shouldDecode) {
        if (shouldDecode)
            return new DecodingNode(textBuffer, textBegin, textEnd);

        return new StringNode(textBuffer, textBegin, textEnd);
    }
}
1
2
3
4
5
6
7
8
9問題在
createStringNode()想要回傳「實作Nodeinterface」的物件,而DecodingNode卻不再實作那個 interface。解決方法是讓DecodingNode實作Node:public class DecodingNode implements Node { private Node delegate; public DecodingNode(StringBuffer textBuffer, int textBegin, int textEnd) { delegate = new StringNode(textBuffer, textBegin, textEnd); } public String toPlainTextString() { return Translate.decode(delegate.toPlainTextString()); } public void accept(NodeVisitor visitor) { } public void collectInto(NodeList collectionList, Class nodeType) { } // etc. }1
2
3
4
5
6
7
8
9
10
11
12
13
14
15
16
17
18
19
20Replace Inheritance with Delegation 的最後步驟是讓剛才加到
DecodingNode的每個函式呼叫delegate上相應函式:public class DecodingNode implements Node { // ... public void accept(NodeVisitor visitor) { delegate.accept(visitor); } public void collectInto(NodeList collectionList, Class nodeType) { delegate.collectInto(collectionList, nodeType); } // etc. }1
2
3
4
5
6
7
8
9
10
11現在,
DecodingNode差不多是個 Decorator 了。唯一問題是:delegate欄位已經被具現,而不是經由建構式參數傳入。為了修正這件事,作者使用 Extract Parameter 和 Remove Parameter:public class StringNode extends AbstractNode { // ... public static Node createStringNode( StringBuffer textBuffer, int textBegin, int textEnd, boolean shouldDecode) { if (shouldDecode) return new DecodingNode( new StringNode(textBuffer, textBegin, textEnd) ); return new StringNode(textBuffer, textBegin, textEnd); } public class DecodingNode implements Node { // ... private Node delegate; public DecodingNode( Node newDelegate ) { delegate = newDelegate; } } }1
2
3
4
5
6
7
8
9
10
11
12
13
14
15
16
17
18現在
DecodingNode終於成為 Decorator。下圖是它如何配合並融入繼承體系: