# Unify Interfaces with Adapter
用 Adapter 統一介面
# 動機
當下列所有條件成立時,refactor to Adapter 可以帶來效益:
- 兩個類別做相同或類似的事情,但擁有不同的介面
- 如果這些類別共用相同介面,客戶碼會更單純、更直觀、更簡練
- 你無法改變其中一個類別的介面,因為
- 它是第三方函式庫的一部分
- 它是其他許多客戶已經使用的框架的一部分
- 你沒有他的 source code
優點
- 讓客戶碼可以透過相同介面來和替換性類別(alternative classes)溝通,來移除或減少重複碼
- 讓客戶碼有可能透過一個共同介面來和各物件溝通,以簡化客戶碼
- 讓客戶碼和替換性類別(alternative classes)的互動方式一致
缺點
- 如果可以改變類別的介面而不必 adapt 它的話,這樣做會讓設計變得複雜
# 作法
客戶偏好某個類別(A)的介面勝過另一個(B),對 A 進行 Extract Interface,建立公共介面。如果類別 A 有任何函式的參數是自身的型別,將型別改為上面的公共介面。
面對任何使用 adaptee(類別 B)的客戶碼,進行 Extract Class 產生一個 primitive adapter,這個新抽取出來的類別內含一個 adaptee 欄位、一個該欄位的 getter、一個該欄位的 setter、或「用來設定 adaptee」的建構式參數和建構式函式碼。
將客戶碼中所有與 adaptee 型別有關的欄位、區域變數和參數都改成 adapter 型別。這會改變客戶碼對 adaptee 的所有呼叫動作,讓它在呼叫任何 adaptee 函式前先從 adapter 取得一個 adaptee reference。
在客戶碼呼叫一個 adaptee 函式(透過 adapter 的 getter)的任何地點進行 Extract Method,建立「adaptee 叫喚函式」(invocation method)。令此函式帶一個 adaptee 參數,並讓此函式在呼叫 adaptee 函式時用上這一個參數值。
對「adaptee 叫喚函式」實施 Move Method 移到 adapter 內。現在客戶對任何 adaptee 函式的呼叫都會穿過 adapter。
將函式移到 adapter 時,讓它近似公共介面中對應的函式。如果被移動的函式需要從客戶端取一個值來通過編譯,請避免用參數的形式加入函式,這會讓函式的簽名式和公共介面對應的函式不同。盡量找不擾動簽名式又能傳遞該值的方法
- 透過 adapter 的建構式
- 把某個物件的 reference 傳給 adapter,讓 adapter 能在執行期獲得該值
修改 adapter,讓它正式實作公共介面。修改所有「接受 adapter 型別參數」的 adapter 函式,讓它們改成接受「型別為公共介面」的參數。
修改客戶端類別,讓它所有欄位、區域變數和參數都使用公共介面,不再使用 adapter 型別。
現在,客戶碼使用公共介面來和兩個類別溝通。如果要更進一步在客戶碼移除重複,通常可以使用 Form Template Method 和 Introduce Polymorphic Creation with Factory Method 等重構。
# 範例
本範例和建立 XML 的程式碼有關,請參考:
- Replace Implicit Tree with Composite
- Encapsulate Compose with Builder
- Introduce Polymorphic Creation with Factory Method
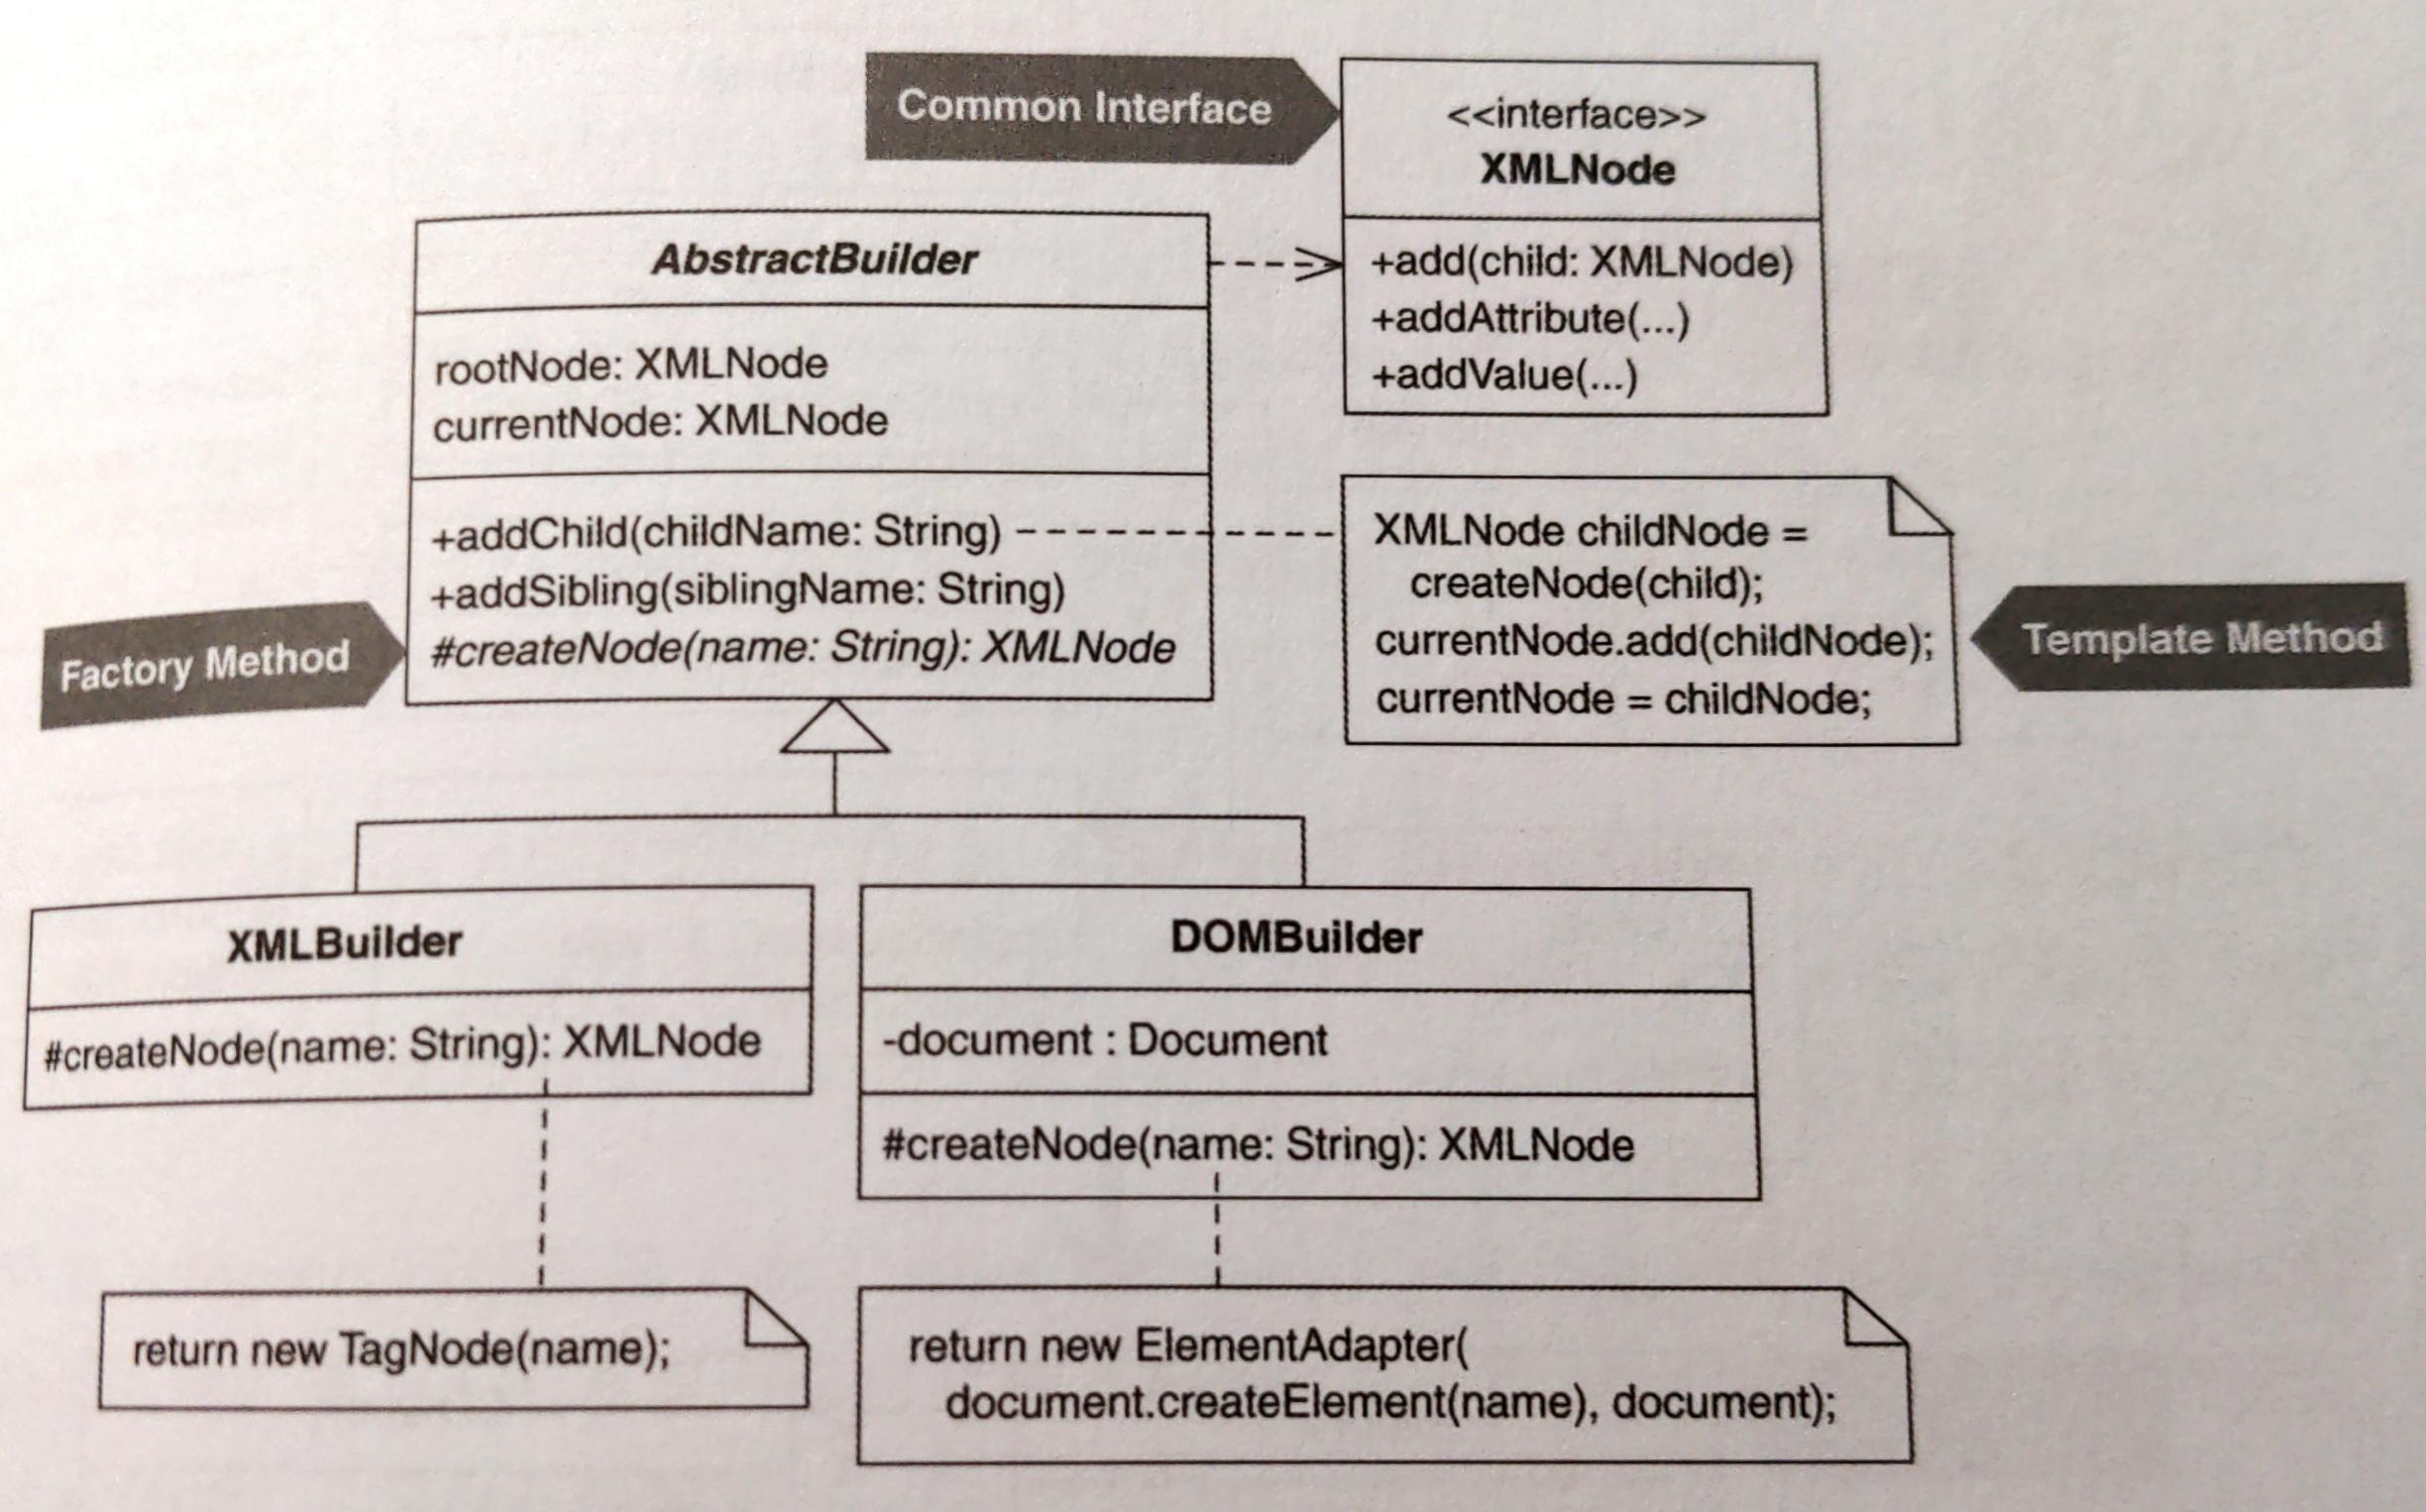
XMLBuilder 和 DOMBuilder 程式碼大半相同,不過 XMLBuilder 和 TagNode 類別合作,而 DOMBuilder 則是和實作 Element 的物件合作:
public class DOMBuilder extends AbstractBuilder {
    private Document document;
    private Element root;
    private Element parent;
    private Element current;

    public void addAttribute(String name, String value) {
        current.setAttribute(name, value);
    }
    public void addBelow(String child) {
        Element childNode = document.createElement(child);
        current.appendChild(childNode);
        parent = current;
        current = childNode;
        history.push(current);
    }
    public void addBeside(String sibling) {
        if (current == root)
            throw new RuntimeException(CANNOT_ADD_BESIDE_R OOT);

        Element siblingNode = document.createElement(sibling);
        parent.appendChild(siblingNode);
        current = siblingNode;
        history.pop();
        history.push(current);
    }
    public void addValue(String value) {
        current.appendChild(document.createTextNode(value));
    }
}
2
3
4
5
6
7
8
9
10
11
12
13
14
15
16
17
18
19
20
21
22
23
24
25
26
27
28
29
30
以下是 XMLBuilder:
public class XMLBuilder extends AbstractBuilder {
    private TagNode rootNode;
    private TagNode currentNode;

    public void addChild(String childTagName) {
        addTo(currentNode, childTagName);
    }
    public void addSibling(String siblingTagName) {
        addTo(currentNode.getParent(), siblingTagName);
    }
    private void addTo(TagNode parentNode, String tagName) {
        currentNode = new TagNode(tagName); parentNode.add(currentNode);
    }
    public void addAttribute(String name, String value) {
        currentNode.addAttribute(name, value);
    }
    public void addValue(String value) {
        currentNode.addValue(value);
    }
}
2
3
4
5
6
7
8
9
10
11
12
13
14
15
16
17
18
19
20
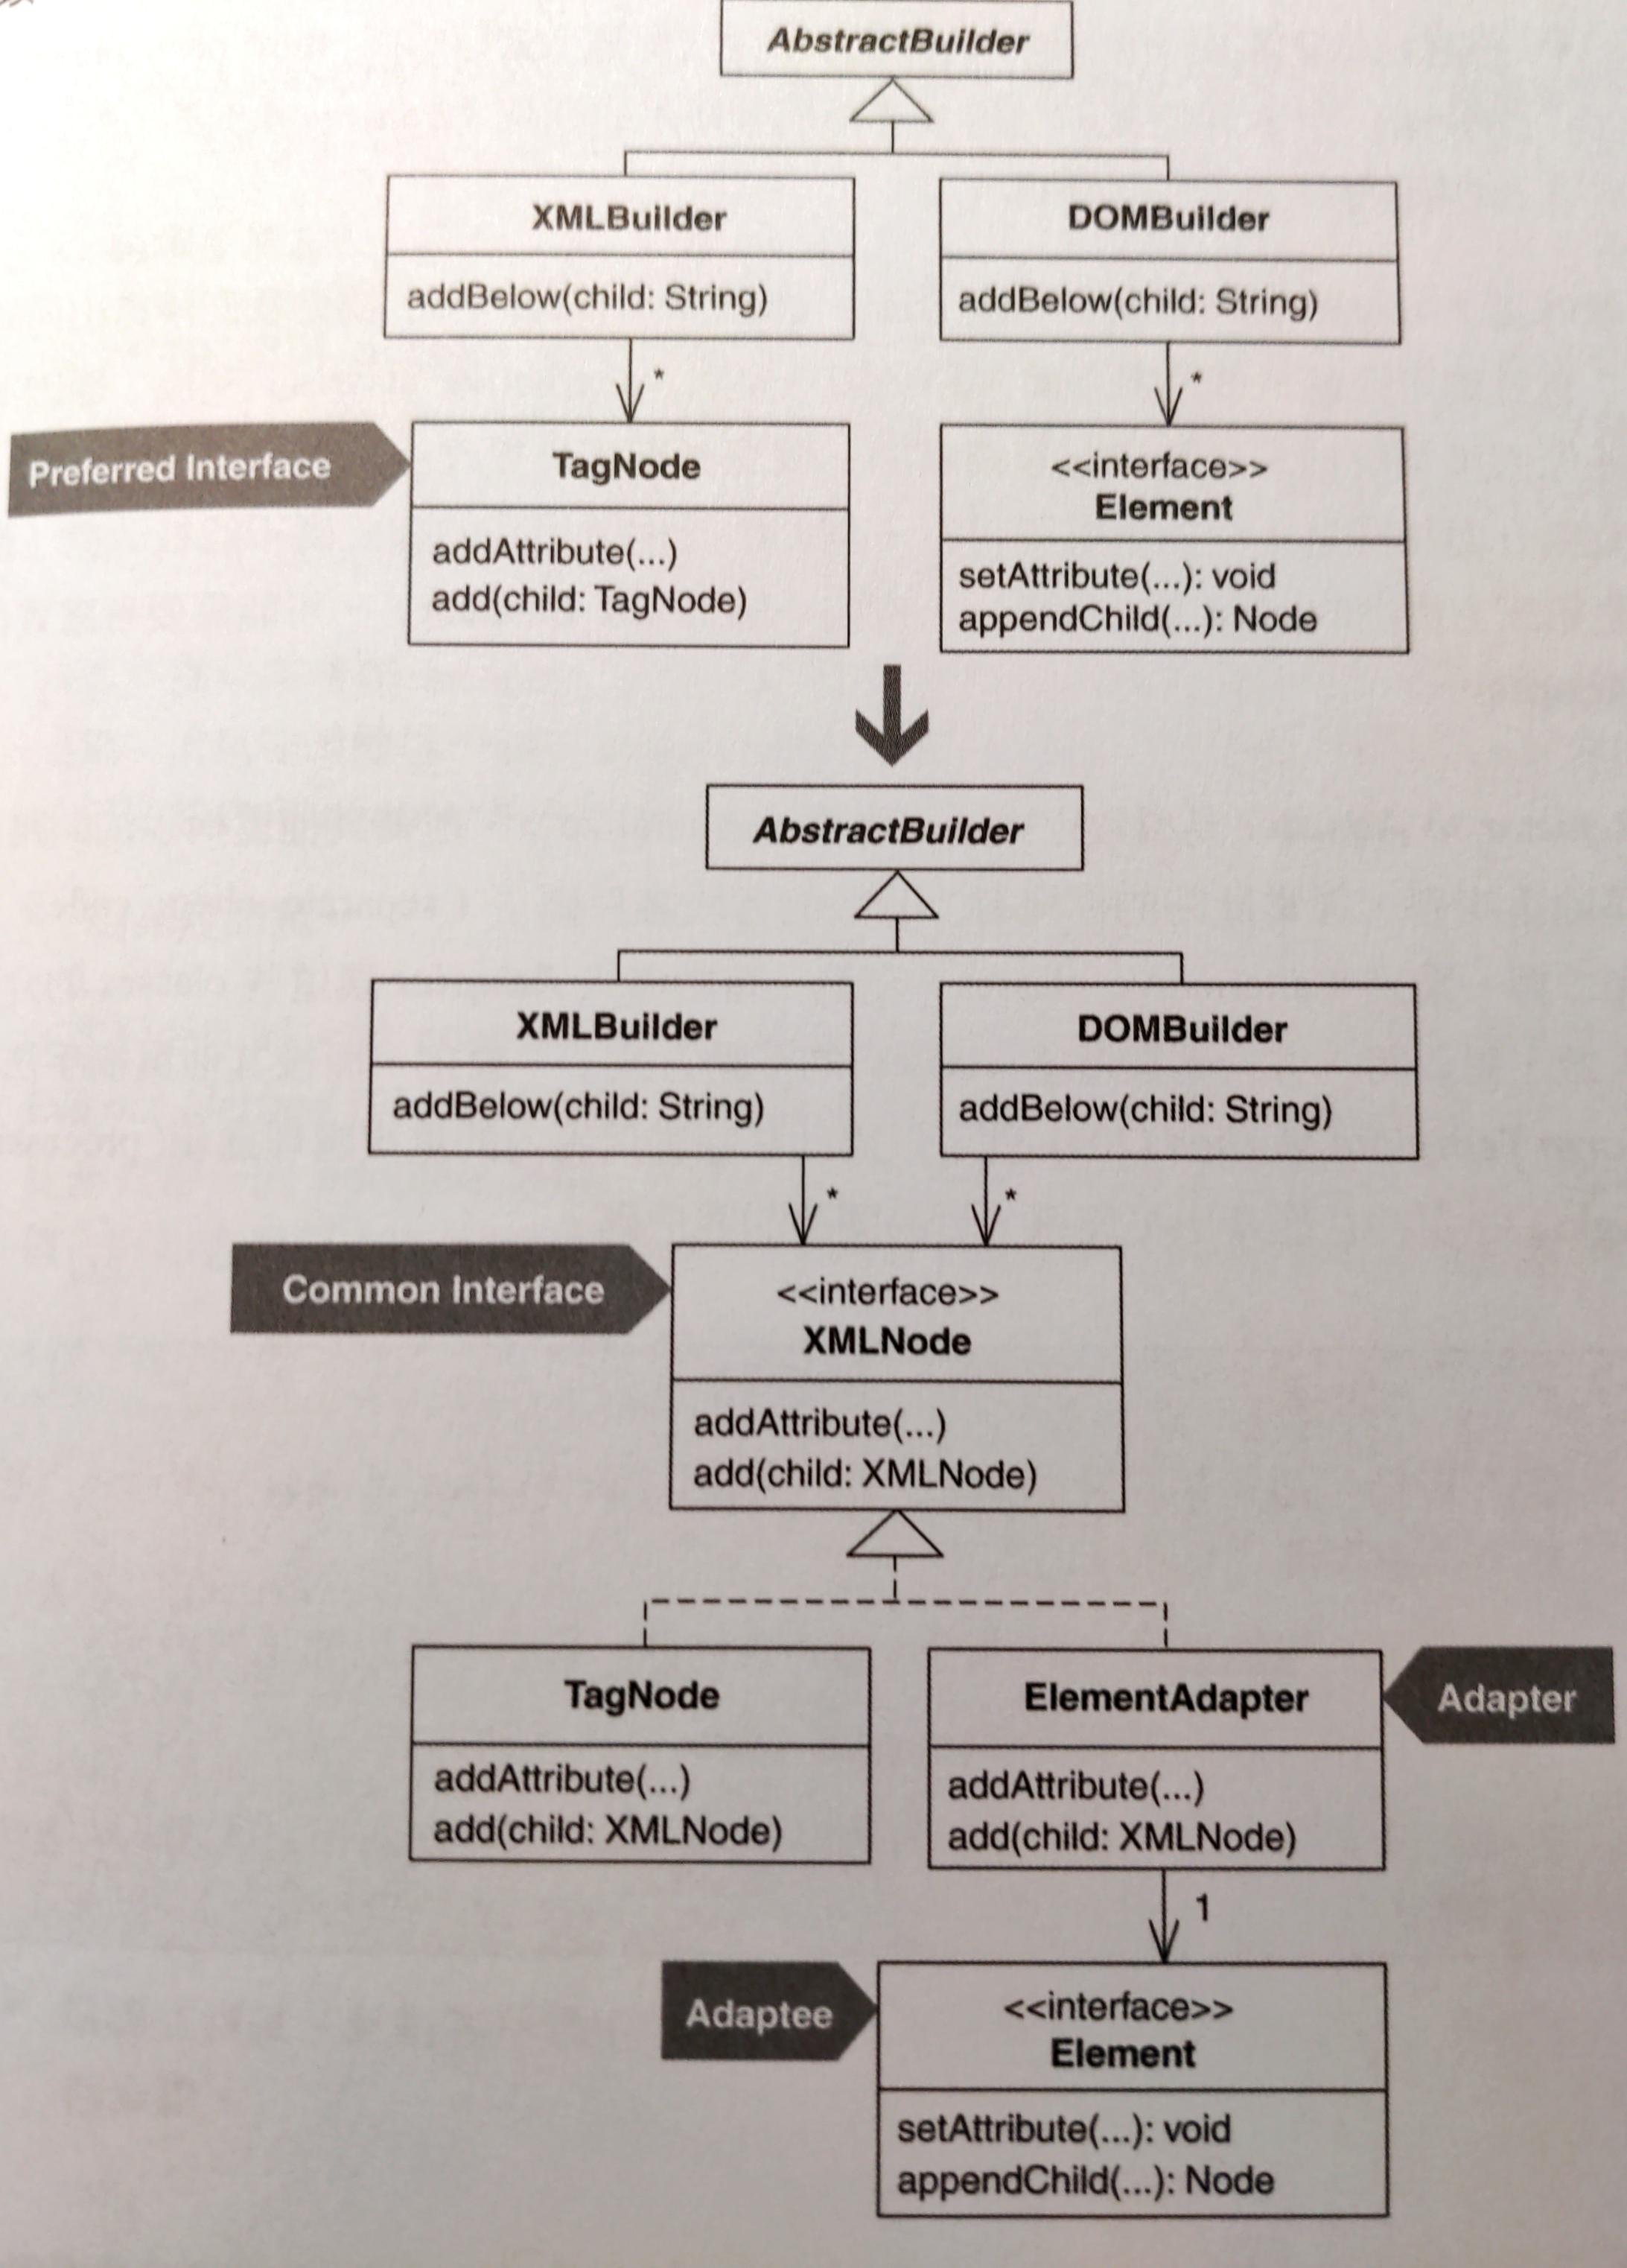
DOMBuilder 和 XMLBuilder 幾乎相同,只是每個 builder 不是和 TagNode 合作就是和 XMLBuilder 一起運作。這項重構目的是建立 TagNode 和 Element 的公共介面,來消除 builder 各函式的重複。
第一步是建立公共介面。我以
TagNode為這個介面的基礎。TagNode約有 10 個函式,其中 5 個是 public。公共介面只需要其中 3 個。實施 Extract Interface:public interface XMLNode { public abstract void add(XMLNode childNode); public abstract void addAttribute(String attribute, String value); public abstract void addValue(String value); } public class TagNode implements XMLNode { // ... public void add( XMLNode childNode) { children().add(childNode); } // etc. }1
2
3
4
5
6
7
8
9
10
11
12
13開始處理
DOMBuilder。實施 Extract Class 建立Element的 adapter:public class ElementAdapter { Element element; public ElementAdapter(Element element) { this.element = element; } public Element getElement() { return element; } }1
2
3
4
5
6
7
8
9
10把
DOMBuilder所有Element欄位都改成ElementAdapter型別,並且更新程式碼:public class DOMBuilder extends AbstractBuilder { private Document document; private ElementAdapter rootNode; private ElementAdapter parentNode; private ElementAdapter currentNode; public void addAttribute(String name, String value) { currentNode.getElement().setAttribute(name, value); } public void addChild(String childTagName) { ElementAdapter childNode = new ElementAdapter(document.createElement(childTagName)); currentNode.getElement().appendChild(childNode.getElement()); parentNode = currentNode; currentNode = childNode; history.push(currentNode); } public void addSibling(String siblingTagName) { if (currentNode == root) throw new RuntimeException(CANNOT_ADD_BESIDE_ROOT); ElementAdapter siblingNode = new ElementAdapter(document.createElement(siblingTagName)); parentNode.getElement().appendChild(siblingNode .getElement()); currentNode = siblingNode; history.pop(); history.push(currentNode); } }1
2
3
4
5
6
7
8
9
10
11
12
13
14
15
16
17
18
19
20
21
22
23
24
25
26
27針對
DOMBuilder呼叫的每個 adaptee 函式建立一個「adaptee 叫喚函式」(invocation method)。我以 Extract Method 達成目的,並確保每個被提煉的函式都帶有一個 adaptee 參數且在函式本體中使用它。public class DOMBuilder extends AbstractBuilder { public void addAttribute(String name, String value) { addAttribute(currentNode, name, value); } private void addAttribute(ElementAdapter current, String name, String value) { currentNode.getElement().setAttribute(name, value); } public void addChild(String childTagName) { ElementAdapter childNode = new ElementAdapter(document.createElement(childTagName)); add(currentNode, childNode); parentNode = currentNode; currentNode = childNode; history.push(currentNode); } private void add(ElementAdapter parent, ElementAdapter child) { parent.getElement().appendChild(child.getElement()); } public void addSibling(String siblingTagName) { if (currentNode == root) throw new RuntimeException(CANNOT_ADD_BESIDE_ROOT); ElementAdapter siblingNode = new ElementAdapter(document.createElement(siblingTagName)); add(parentNode, siblingNode); currentNode = siblingNode; history.pop(); history.push(currentNode); } public void addValue(String value) { addValue(currentNode, value); } private void addValue(ElementAdapter current, String value) { currentNode.getElement().appendChild(document.createTextNode(value)); } }1
2
3
4
5
6
7
8
9
10
11
12
13
14
15
16
17
18
19
20
21
22
23
24
25
26
27
28
29
30
31
32
33
34
35
36
37
38
39
40現在我可以實施 Move Method 把每個「adaptee 叫喚函式」都移到
ElementAdapter中。我希望被移的函式相似於公共介面XMLNode中的相應函式。對各個函式都很容易做到,除了addValue(),等等再處理。以下是搬移addAttribute()和add()後的結果:public class ElementAdapter { Element element; public ElementAdapter(Element element) { this.element = element; } public Element getElement() { return element; } public void addAttribute(String name, String value) { getElement().setAttribute(name, value); } public void add(ElementAdapter child) { getElement().appendChild(child.getElement()); } }1
2
3
4
5
6
7
8
9
10
11
12
13
14
15
16
17
18
19以下是
DOMBuilder因為搬移造成的變更例子:public class DOMBuilder extends AbstractBuilder { public void addAttribute(String name, String value) { currentNode.addAttribute(name, value); } public void addChild(String childTagName) { ElementAdapter childNode = new ElementAdapter(document.createElement(childTagName)); currentNode.add(childNode); parentNode = currentNode; currentNode = childNode; history.push(currentNode); } } // etc.1
2
3
4
5
6
7
8
9
10
11
12
13
14
15addValue()比較難搬,因為它依賴ElementAdapter內的document欄位:public class DOMBuilder extends AbstractBuilder { private Document document; public void addValue(ElementAdapter current, String value) { current.getElement().appendChild(document.createTextNode(value)); } }1
2
3
4
5
6
7我不想把型別為
Document的那個欄位搬到ElementAdapter的addValue()中,因為這樣做會讓這個函式更遠離目的地:XMLNode的addValue()。我決定藉由
ElementAdapter的建構式把一個Document實體傳到ElementAdapter:public class ElementAdapter { Element element; Document document; public ElementAdapter(Element element, Document document ) { this.element = element; this.document = document; } }1
2
3
4
5
6
7
8
9並且在
DOMBuilder做一些必要的修改。現在可以輕鬆搬移addValue()了:public class ElementAdapter { public void addValue(String value) { getElement().appendChild(document.createTextNode(value)); } }1
2
3
4
5現在讓
ElementAdapter實作XMLNodeinterface。這個步驟直接且明確,唯一例外是必須對add()做些改變,讓它能呼叫getElement(),因為後者並不是XMLNodeinterface 的一部分:public class ElementAdapter implements XMLNode { public void add(XMLNode child) { ElementAdapter childElement = (ElementAdapter)child; getElement().appendChild(childElement.getElement()); } }1
2
3
4
5
6最後,修改
DOMBuilder讓它「型別為ElementAdapter」的所有欄位、區域變數和參數都改變型別為XMLNode:public class DOMBuilder extends AbstractBuilder { private Document document; private XMLNode rootNode; private XMLNode parentNode; private XMLNode currentNode; public void addChild(String childTagName) { XMLNode childNode = new ElementAdapter(document.createElement(childTagName), document); // ... } protected void init(String rootName) { document = new DocumentImpl(); rootNode = new ElementAdapter(document.createElement(rootName), document); document.appendChild(((ElementAdapter)rootNode).getElement()); // ... } }1
2
3
4
5
6
7
8
9
10
11
12
13
14
15
16
17
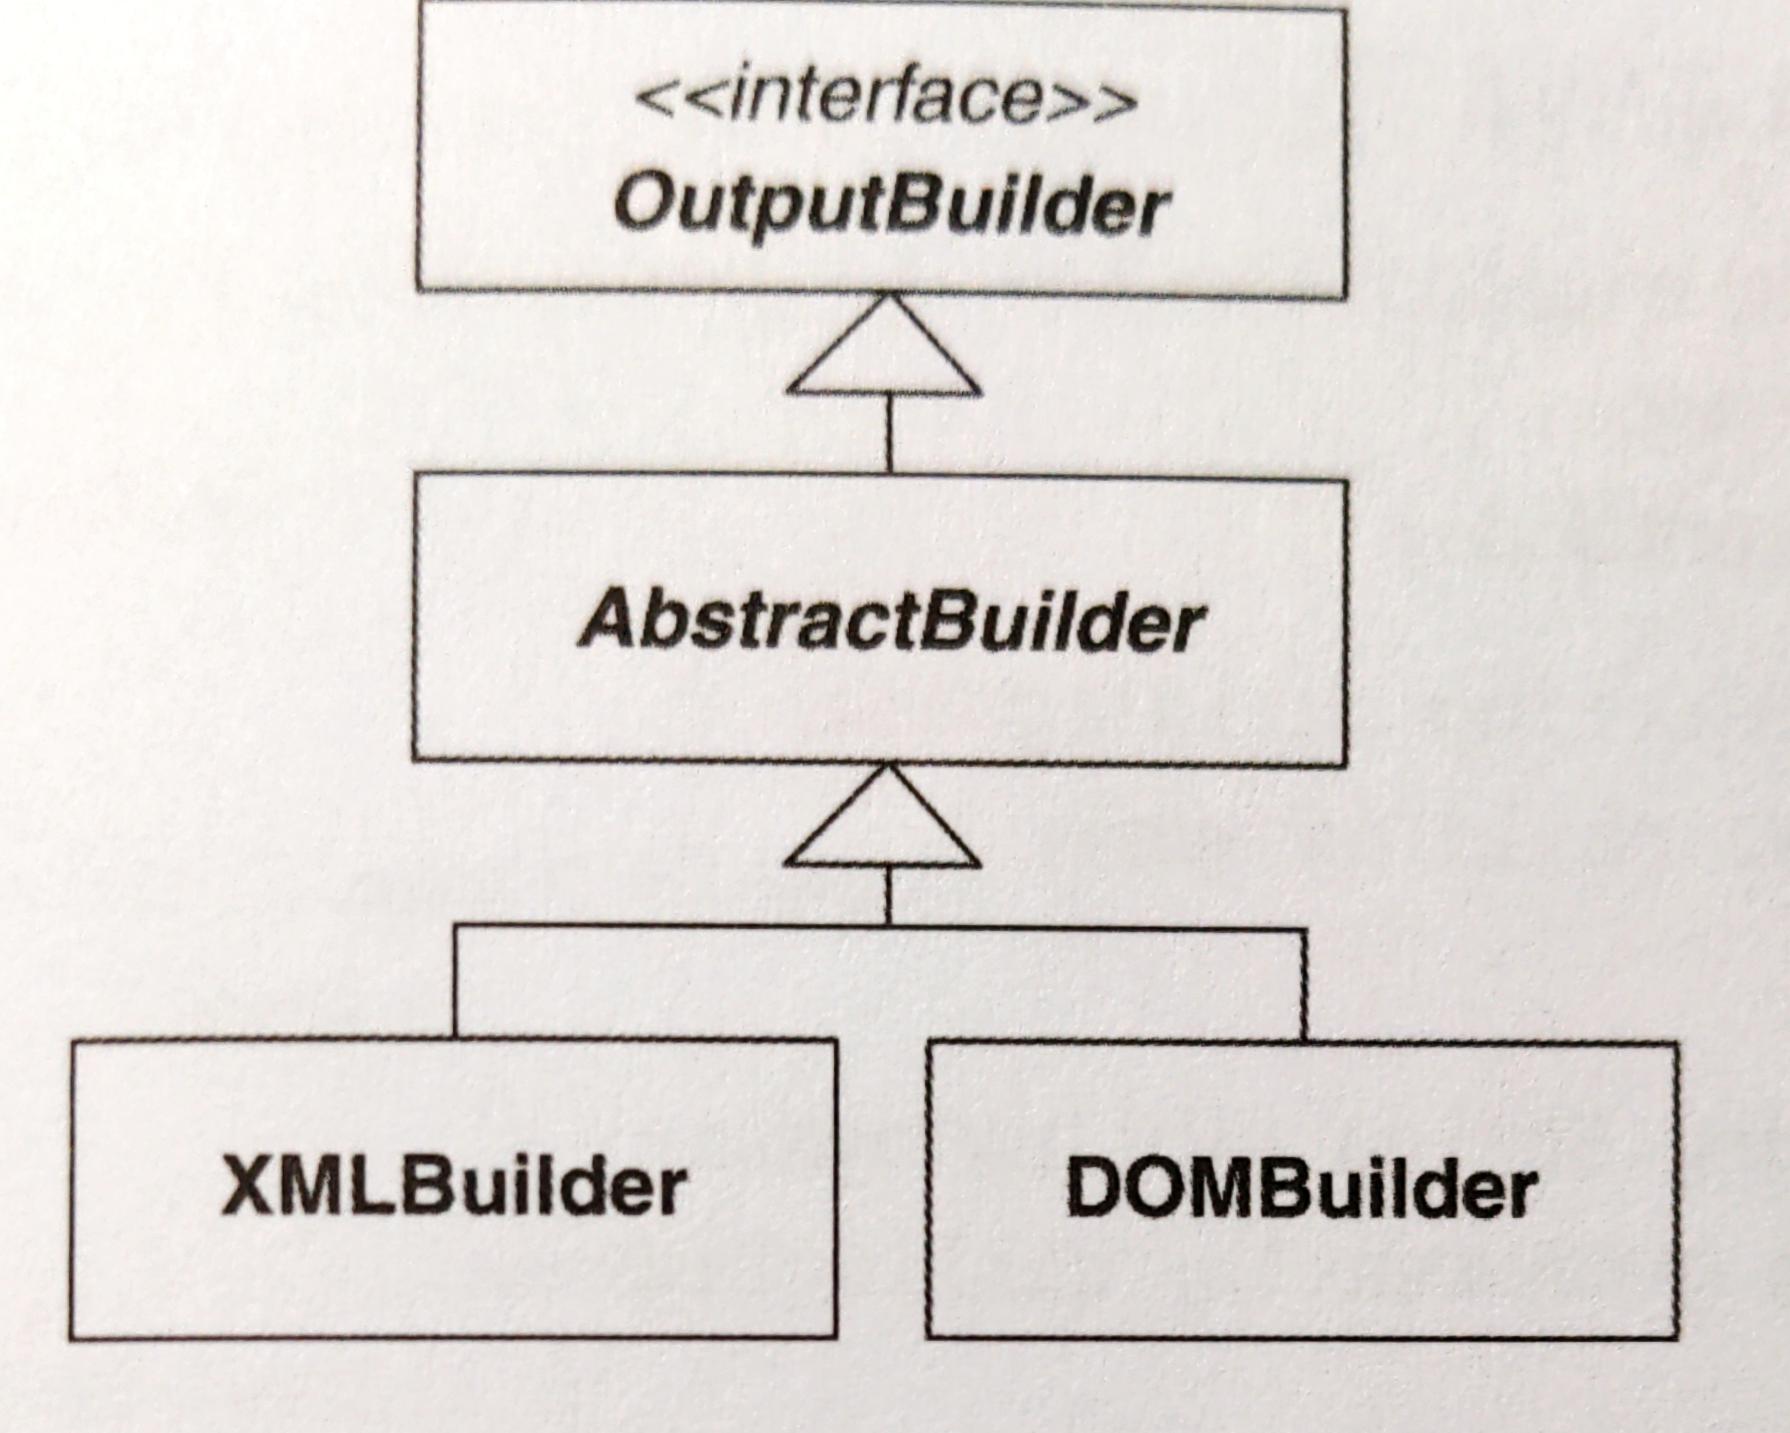
18這時候由於配接
DOMBuilder內的Element造成XMLBuilder的程式碼和DOMBuilder的程式碼如此相似,導致將程式碼上提到AbstractBuilder變得可行。最後實施 Form Template Method 和 Introduce Polymorphic Creation with Factory Method 完成。以下是最後結果: